AWS Elastic Kubernetes Service with Traefik v2 and the AWS CDK

Guest post by Traefik Ambassador, Raf Rasenberg.
Introduction 📍
Today we are setting up an EKS cluster using the AWS CDK and TypeScript, with Traefik v2 as our cluster Ingress controller. We will make the Traefik dashboard securely, publicly accessible and as an example, we will deploy a basic whoami service to see all of it in action.
Prerequisites
- AWS account
- AWS CDK
- A hosted zone configured in Route 53
- kubectl installed
NOTE: Following this tutorial can lead to some small costs within AWS, since not everything is covered by the free tier. However, if you clean up the resources afterwards, this will be no more than some cents.
You can find the Github repo here.


What is AWS CDK and why should I care?
The AWS Cloud Development Kit (AWS CDK) is an open-source software development framework to define cloud infrastructure in code and provision it through AWS CloudFormation. It is developed and maintained by AWS itself.
Because it's a high-level object-oriented abstraction of defining AWS resources, it's an extremely powerful infrastructure as code tool for an AWS native architecture. With relatively little effort, you can deploy complex infrastructures, all in code.
Convinced? I am!
Let's see how we can combine the power of AWS CDK with EKS and Traefik! 🚀
Setting up our project
Create a folder called ops and within that folder, run the following command:
cdk init --language=typescript
This will set you up with all the necessary files to get started. You'll be greeted with the following folder structure:
.
└── ops/
    ├── bin/
    │   └── ops.ts
    ├── lib/
    │   └── ops-stack.ts
    ├── test/
    └── ...
Of course, you can name the folder whatever you want, accordingly, it will generate different file names for your project. But for the sake of simplicity, I'm just sticking with ops throughout this post.
Setting the env
The first thing we want to do before we start writing our stack is creating some constants that we will use. Create a lib/constants.ts file and add the following constants:
interface awsENV {
  account: string;
  region: string;
}
export const envEU: awsENV = {
  account: "1087695414932",
  region: "eu-central-1",
};
export const hostedZone: string = "inqdocloud.tech";
export const traefikNamespace: string = "traefik";
export const traefikBasicAuthString: string = "cmFmOiRhcHIxJDR4eEczM20wJG52SXhpSDJESTZmZHpFSnJpN2c5YjAKCg==";
The first constant is our AWS env. We create an interface for it for type safety, since we are using TypeScript here. You'd probably want to move that into a separate file and import it, but for simplicity's sake, I'll keep it like this.
The envEU constant is needed to do a Route53 lookup later on in the code. You need to specify account/region at stack level otherwise it will throw an error.
You can either do that by configuring "env" with explicit account and region when you define your stack, or use the environment variables CDK_DEFAULT_ACCOUNT and CDK_DEFAULT_REGION to inherit environment information from the CLI.
Replace the account number with your AWS account number, and change the region to the region in which you want to deploy your cluster.
Then within bin/ops.ts import envEU and add it to the stack, like so:
...
import { envEU } from "../lib/constants"

const app = new cdk.App();
new OpsStack(app, 'OpsStack', { env: envEU });
Defining the other constants
The next constant is our hosted Route53 zone. Make sure you add this through the AWS console before continuing!
The second one will be our namespace on the Kubernetes cluster where we will install all of our Traefik resources. I named it traefik, however, some prefer to add them to to kube-system for example, so I defined it as a variable.
The last constant we will define is our basic auth name plus hashed password. This will allow us to make the Traefik dashboard publicly accessible, but protected through a username and password. We will set this as an Secret in Kubernetes, so it expects it to be base64 encoded. To create this string, run (replacing user & password):
htpasswd -nb user password | openssl base64
Alright, that's done. Let's start building our stack! 🚧
Generating a wildcard certificate
Let's define our infrastructure. We will first need to install some CDK packages that we are going to use. Run:
npm install @aws-cdk/aws-eks @aws-cdk/aws-route53 @aws-cdk/aws-certificatemanager @aws-cdk/aws-ec2
Open the ops-stack.ts file and add the required imports:
import * as cdk from "@aws-cdk/core";
import * as eks from "@aws-cdk/aws-eks";
import * as route53 from "@aws-cdk/aws-route53";
import * as acm from "@aws-cdk/aws-certificatemanager";
import * as ec2 from "@aws-cdk/aws-ec2";

import { hostedZone } from "./constants";

export class OpsStack extends cdk.Stack {
  constructor(scope: cdk.Construct, id: string, props?: cdk.StackProps) {
    super(scope, id, props);

    // We are going to define our code here
  }
}
Now the first thing we are going to do is look up our Route53 hosted zone and generate a wildcard certificate for that.
This will allow us to easily deploy SSL secured services on sub-domains of our root TLD. e.g. traefik.inqdocloud.tech for our dashboard and whoami.inqdocloud.tech for our little whoami service.
This comes in super handy for corporates, since it allows for easy deployments of new internal services, since Traefik will pick up new services in our cluster and handle the ingress routing, and our public-facing load balancer + wildcard certificate will take care of the rest. No need for provisioning new SSL certificates for any subdomain we add.
Let's add our code:
// Lookup hosted zone
const zone = route53.HostedZone.fromLookup(this, "MyCoolHostedZone", {
  domainName: hostedZone,
});

// Create a wildcard certificate for our hosted zone
const cert = new acm.Certificate(this, "MySecureWildcardCert", {
  domainName: `*.${hostedZone}`,
  validation: acm.CertificateValidation.fromDns(zone),
});
Here we look up the Route53 hosted zone from the constant we specified earlier, and then afterward we generate a new wildcard certificate for it.
NOTE: All of this code lives within the OpsStack. The unit of deployment in the AWS CDK is called a stack. All AWS resources defined within the scope of a stack, either directly or indirectly, are provisioned as a single unit.
Provisioning the EKS cluster
The next step is provisioning our EKS cluster. Add the following code:
// New VPC
const vpc = new ec2.Vpc(this, "MyAwesomeVPC", {
  maxAzs: 2,
  natGateways: 1,
});

// Provision an EKS cluster
const cluster = new eks.Cluster(this, "MySuperCluster", {
  version: eks.KubernetesVersion.V1_19,
  vpc,
});
This is going to create a VPC (Virtual Private Network) for us, with a lot of things pre-configured. The only thing I changed was the NAT gateways, to save some cost. However, if you need better availability, the default 2 is better.
In the cluster, we pass in the VPC and use the Kubernetes 1.19 version. By default, the CDK Cluster construct will allocate a managed node group with 2 m5.large instances. You can of course save a lot of cost by using spot instances for your cluster, however, this is out of the scope of this post. I suggest checking out the CDK docs to get the right configuration for your use case.
Adding the Traefik Ingress controller
The great thing about using the CDK is that we can deploy manifests and helmcharts as native JS objects. This makes things very dynamic and it allows for easy mutating in-flight of certain deployment values.
Let's add the following folder and files into our lib folder:
.
└── ops/
    ├── bin/
    │   └── ops.ts
    ├── lib/
    │   ├── traefik/
    │   │   ├── dashboard.ts
    │   │   └── ingress.ts
    │   └── ops-stack.ts
    ├── test/
    └── ...
The dashboard.ts will hold our manifest deployments of the Traefik dashboard and our basic auth middleware, and ingress.ts will contain the Helm chart deployment configuration. Let's start with ingress.ts:
export const ingressControllerConfig = {
  chart: "traefik",
  repository: "https://helm.traefik.io/traefik",
  namespace: "traefik",
  values: {
    ingressRoute: {
      dashboard: {
        enabled: true,
      },
    },
    ports: {
      web: {
        redirectTo: "websecure",
      },
    },
    service: {
      annotations: {
        "service.beta.kubernetes.io/aws-load-balancer-type": "nlb",
        "service.beta.kubernetes.io/aws-load-balancer-ssl-cert": "<our-dynamically-updated-arn>",
        "service.beta.kubernetes.io/aws-load-balancer-ssl-ports": "443",
      },
      spec: {
        externalTrafficPolicy: "Cluster",
      },
    },
  },
};
We specify the chart and repository to pull from and use the traefik namespace here. With CDK you won't have to create namespaces, if it doesn't exist yet, it will create one during deployment.
As you can see we add some custom configuration in the values part. This is just like passing through a yml file when running a helm install, but now in a regular JS object. How cool is that! 🔥
In our values config, we enable the dashboard and we make sure that we redirect all traffic to 'websecure'.
The last part is the annotations for our load balancer. This will automatically launch a network load balancer in AWS during deployment. The value of the service.beta.kubernetes.io/aws-load-balancer-ssl-cert annotation is just a place filler here since we will override this in our stack, with our dynamically created certificate.
Now let's go back to our OpsStack and add the following code:
import { ingressControllerConfig } from "./traefik/ingress"; // New import

// Pass certificate to Traefik Ingress configuration and add Helm chart
ingressControllerConfig.values.service.annotations["service.beta.kubernetes.io/aws-load-balancer-ssl-cert"] =
  cert.certificateArn;
const controller = cluster.addHelmChart("MyTraefikIngress", ingressControllerConfig);
Here we import our freshly created ingress configuration and add the dynamically created certificate by referencing it through cert.certificateArn. Pretty neat right? 😀
Then we use the addHelmChart method on our configured cluster and pass in the Helm deployment configuration.
Alright, the next part, adding the Traefik dashboard 🚀
Adding the Traefik dashboard
Let's go to our dashboard.ts file, and add the configuration.
The first thing we do is importing the constants that we defined earlier and then creating the Kubernetes secret that holds our basic auth. As you can see, it looks familiar. It's just like regular .yml manifest files.
import { hostedZone, traefikNamespace, traefikBasicAuthString } from "../constants";

export const dashboardAuth = {
  apiVersion: "v1",
  kind: "Secret",
  metadata: {
    name: "traefik-dashboard-basicauth-secret",
    namespace: traefikNamespace,
  },
  data: {
    users: traefikBasicAuthString,
  },
};
Below the dashboardAuth, let's create our middleware. As you can see, here we reference the dashboard auth value as our basicAuth secret.
export const dashboardMiddleware = {
  apiVersion: "traefik.containo.us/v1alpha1",
  kind: "Middleware",
  metadata: {
    name: "traefik-dashboard-basicauth",
    namespace: traefikNamespace,
  },
  spec: {
    basicAuth: {
      secret: dashboardAuth.metadata.name,
    },
  },
};
Now the last thing we need is our ingress route. Let's add that too:
export const dashboardIngressRoute = {
  apiVersion: "traefik.containo.us/v1alpha1",
  kind: "IngressRoute",
  metadata: {
    name: "traefik-dashboard",
    namespace: traefikNamespace,
  },
  spec: {
    entrypoints: ["websecure"],
    routes: [
      {
        kind: "Rule",
        match: `Host("traefik.${hostedZone}")`,
        middlewares: [
          {
            name: dashboardMiddleware.metadata.name,
            namespace: traefikNamespace,
          },
        ],
        services: [
          {
            kind: "TraefikService",
            name: "api@internal",
          },
        ],
      },
    ],
  },
};
We specify our entrypoint here, and make our route available at traefik.<yourhostedzone>. Then we pass in the middleware we created earlier.
You can see the power here in specifying these configuration files as objects. Modifying or adding dynamically becomes extremely easy since you have a full-fledged programming language and all its advantages at hand.
The last thing we need to do is go back to our stack and add the manifest deployments.
import { dashboardIngressRoute, dashboardMiddleware, dashboardAuth } from "./traefik/dashboard"; // New import

// Add middleware with dependency to make sure the Ingress is ready
const middleware = cluster.addManifest("TraefikMiddleWare", dashboardAuth, dashboardMiddleware);
middleware.node.addDependency(controller);

// Add the Traefik dashboard Ingress route & dependency on middleware
const dashboard = cluster.addManifest("TraefikDashboard", dashboardIngressRoute);
dashboard.node.addDependency(middleware);
Here we use the CDK provided addManifest method and pass in the configuration objects. We make sure that we deploy the middleware first, and add a dependency to our ingress controller. Otherwise, CDK will throw an error since they will be applied at the same time and the ingress controller needs to be ready first.
At last, when the middleware is deployed, we add the dashboard ingress route.
Awesome, that's done.
Time to deploy everything! 🎉
cdk deploy
This takes around ~15-20 minutes since we are deploying quite some resources combined, even though it doesn't like a lot due to our code being very minimal. But under the hood, a lot is happening.
NOTE: When using the AWS CDK for the first time, you'll probably need to bootstrap your AWS environment. The CDK will output the proper instructions & command for that.
Now when the stack is done deploying, in order to interact with your cluster through kubectl, you can use the aws eks update-kubeconfig AWS CLI command to configure your local kubeconfig. The EKS module will define a CloudFormation output in your stack which contains the command to run.
So run the command from the output:
aws eks update-kubeconfig --name MySuperCluster2CBDE9FD-3541efa24a824a7784c44dd384913425 --region eu-central-1 --role-arn arn:aws:iam::1087695414932:role/OpsStack-MySuperClusterMastersRole925EEEFB-6JPADWOJ1APE
And then we can check out our cluster:
kubectl get svc -n traefik
If everything went well, you'll see your Traefik LoadBalancer service in there and the external IP of our public-facing load balancer.
The last thing we need to do is adding a Route53 record pointing to our load balancer, to add the dashboard route. For that go to your AWS console, and add an A record and pick the network load balancer we just deployed like so:
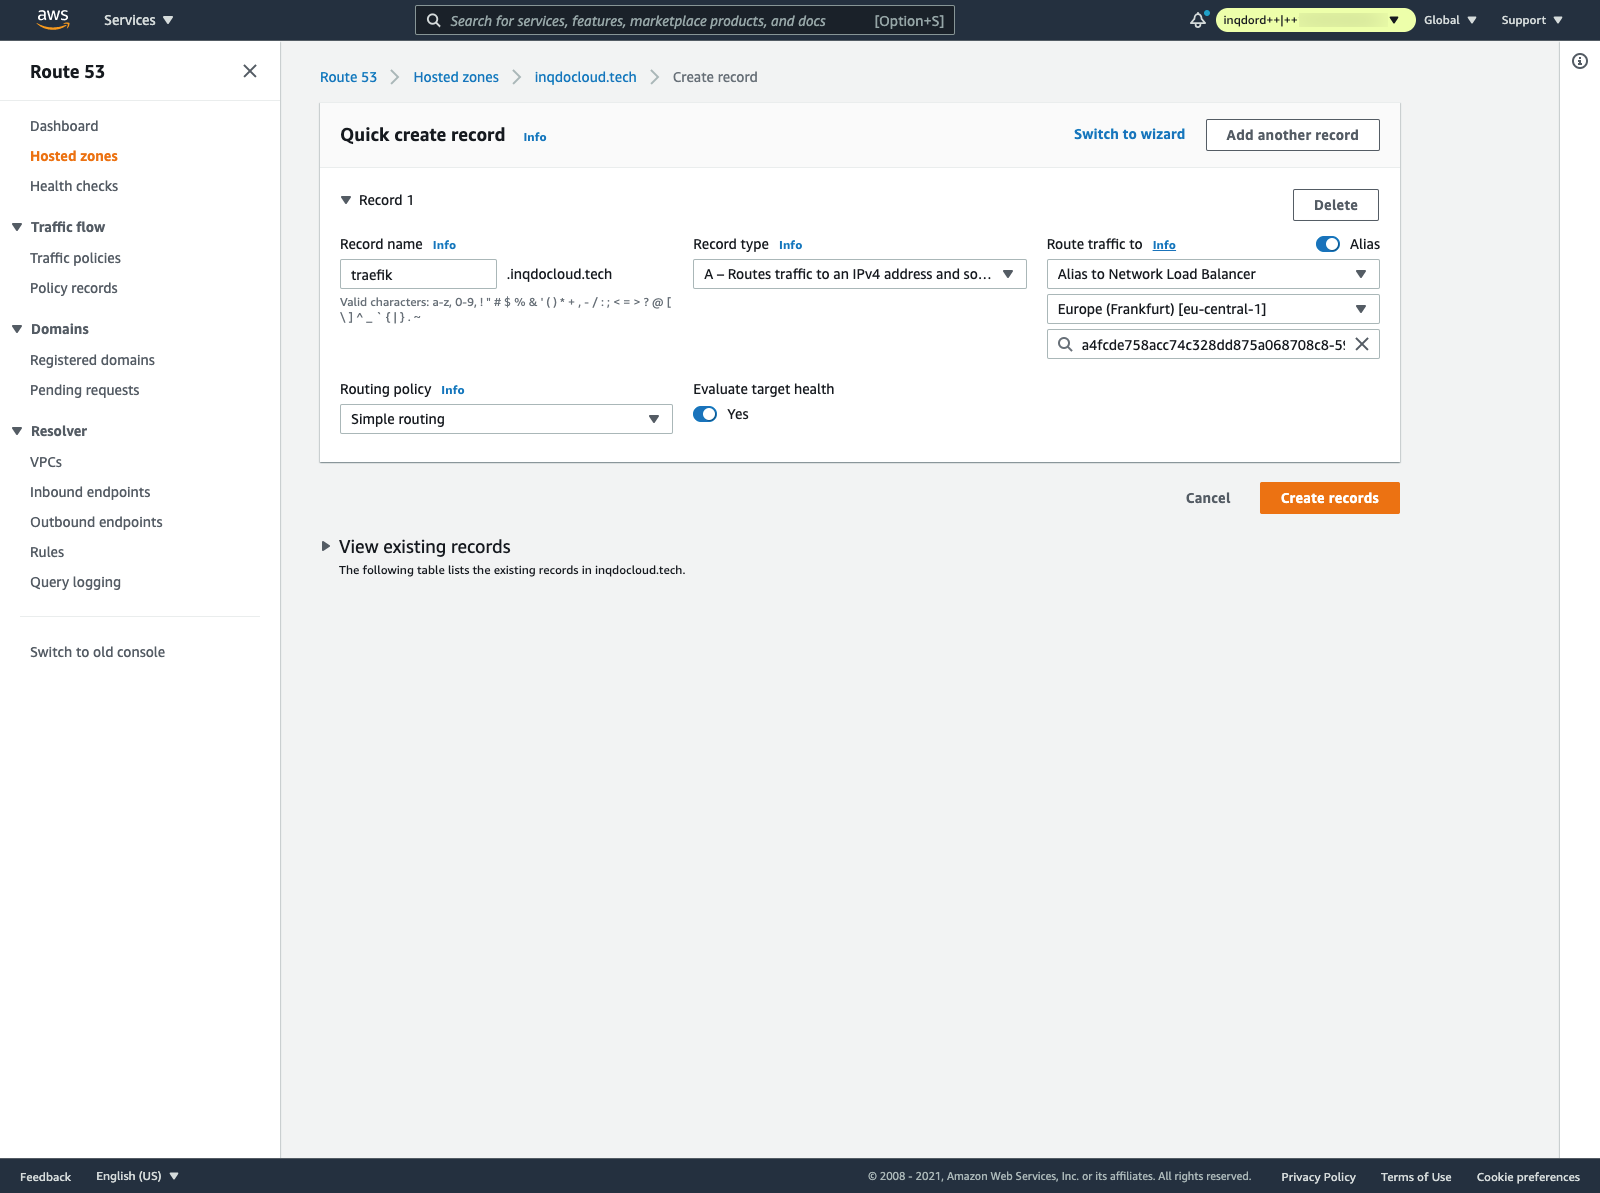
The prettiest would be if we would be able to add this part in code as well. However, I haven't found a good solution for this. Since the Load Balancer service is dynamically created, we don't know the service name.
Therefore using something like getServiceLoadBalancerAddress() does not work. And currently, there is no option within the Helm values to statically define the service name. If anyone knows a solution for this, comment below!
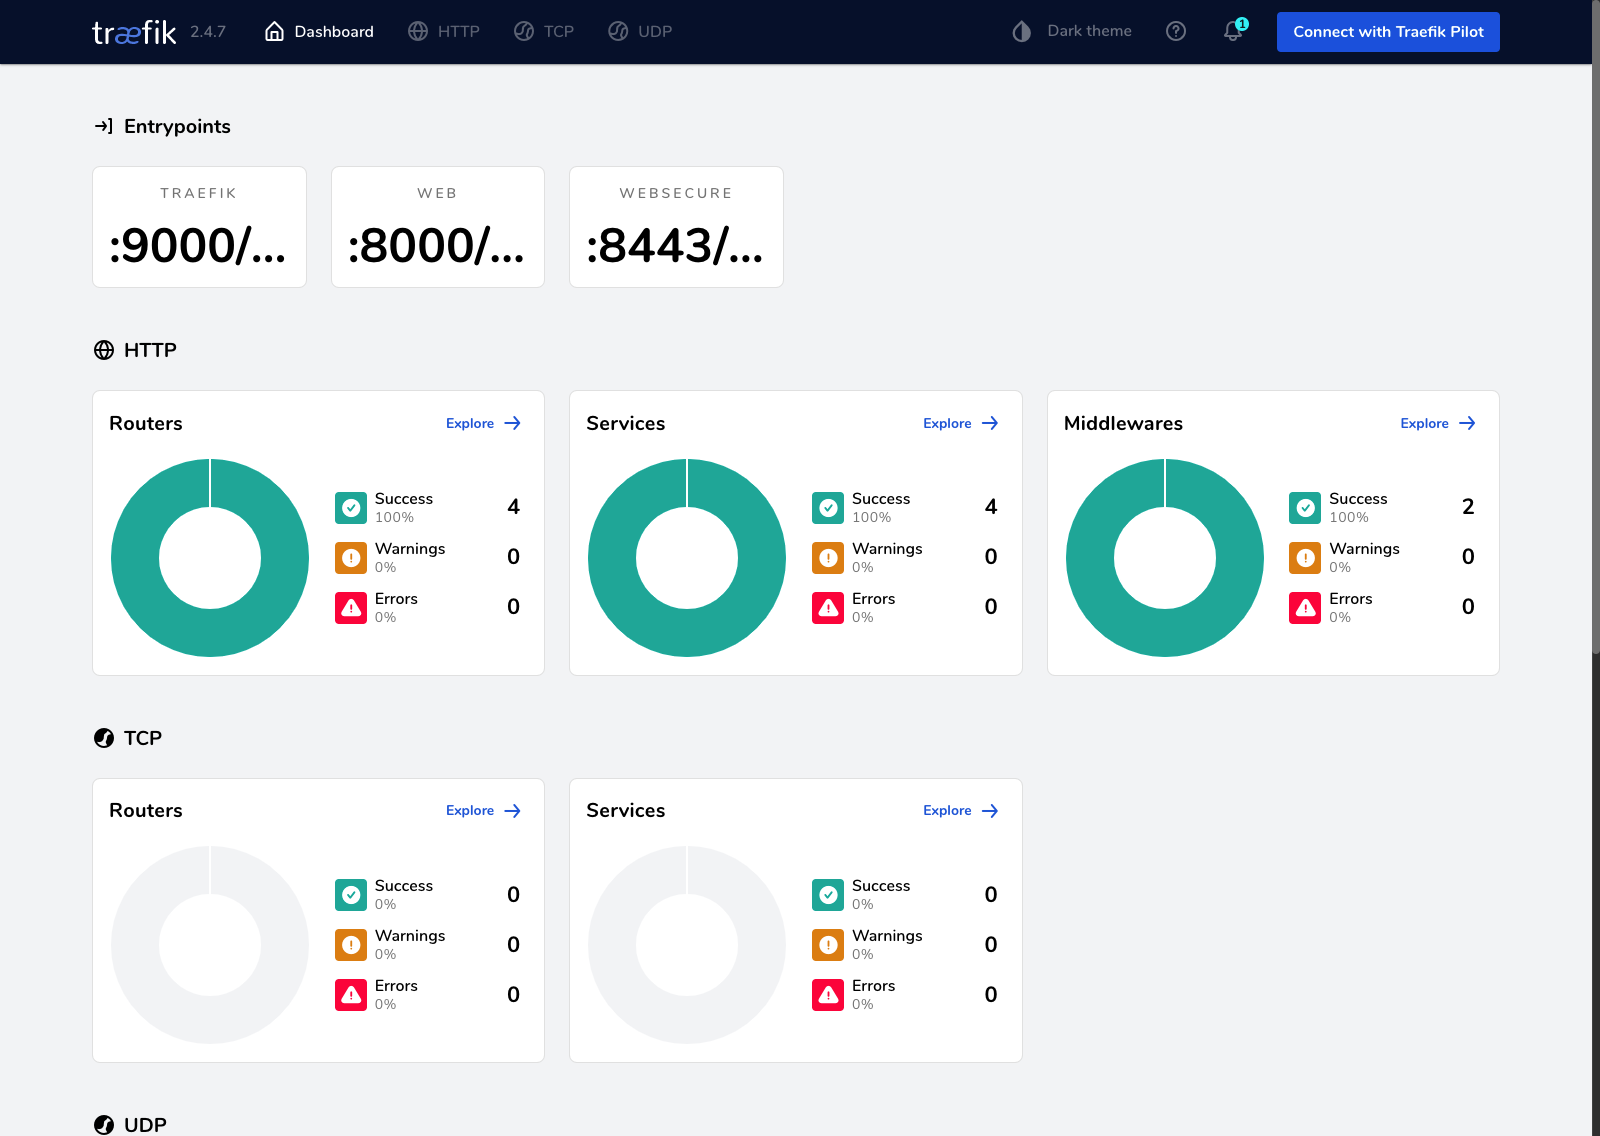
Now visit your domain and enter the basic auth you generated earlier with your specified username and password, and you'll be greeted with the Traefik dashboard. Awesome 🚀
Deploying a sample app
Alright, I hear you say now. That's great Raf, but what about just normal manifest deployments? I don't want to rewrite everything in TypeScript. Well, you won't have to! It works just fine like any other Kubernetes cluster. Let's demonstrate that. Add the following folder and files to your project:
.
├── app/
│   └── whoami/
│       ├── 01-deployment.yml
│       └── 02-ingress.yml
└── ops/
    ├── bin/
    │   └── ops.ts
    ├── lib/
    │   ├── traefik/
    │   │   ├── dashboard.ts
    │   │   └── ingress.ts
    │   └── ops-stack.ts
    ├── test/
    └── ...
Then within 01-deployment.yml, add the following code:
---
apiVersion: v1
kind: Pod
metadata:
  name: whoami
  namespace: traefik
  labels:
    app: whoami
spec:
  containers:
    - name: whoami
      image: traefik/whoami:latest
      ports:
        - containerPort: 80
---
apiVersion: v1
kind: Service
metadata:
  name: whoami
  namespace: traefik
spec:
  ports:
    - port: 80
      protocol: TCP
      targetPort: 80
  selector:
    app: whoami
  type: ClusterIP
As you can see, just your basic whoami .yml like you are used to. Then add the routing in 02-ingress.yml:
apiVersion: traefik.containo.us/v1alpha1
kind: IngressRoute
metadata:
  name: whoami
  namespace: traefik
spec:
  entryPoints:
    - websecure
  routes:
    - match: Host(`whoami.inqdocloud.tech`)
      kind: Rule
      services:
        - name: whoami
          port: 80
Here we can see the power and ease of using Traefik. The only thing we have to specify is our websecure endpoint, and the hostname. Everything else is handled automatically. So add the correct subdomain in Route53 and run the apply command from within our root:
kubectl apply -f app/whoami/
And that's it! Since we have a wildcard domain, an SSL secured route is added for our whoami service, and it should be available now through your specified subdomain. As you can see, Traefik is correctly picking it up in the dashboard as well. Awesome! 🔥

Conclusion ⚡️
Alright, now you see how easy it is to provision an EKS cluster using the AWS CDK and the ease of using Traefik as an Ingress controller. We wrote a minimal amount of code, to get the job done.
Next time we might take a look at the new experimental Kubernetes Gateway API and see how we can integrate that using AWS services & Traefik.
See you next time! 👋
About Raf Rasenberg:
Dutch Software Engineer with a big passion for back-end development, cloud and anything DevOps related. In love with K8s, AWS and serverless. Occasionally lifts weights. Currently working as an AWS Cloud Engineer in The Netherlands.


