OpenID Connect: What Is It And How Does It Work?
The lack of a universally accepted identification system poses a lot of challenges in our everyday lives. Imagine how much time, effort, and bureaucracy such a unified system could save for citizens as well as government administrators.
Unfortunately, given the vast range of different levels of development, governing systems, and cultural peculiarities, there are significant risks and challenges involved in the identification process, including but not limited to privacy and security violations, vendor or technology lock-in, and unsuitable or unsustainable tech and design choices.
A universally accepted digital identification system, on the other hand, is a challenge that the tech industry has overcome. Although the digital world faced similar risks and challenges — the risk of security violations, incompatible technologies or programming languages, different application architectures, etc. — the development and adoption of universally accepted identification protocols has been a turning point.
But authentication and authorization — and the OpenID Connect protocol, in particular — are very complex concepts, often followed by misconceptions, misinformation, or confusion. This article scratches the surface of what OIDC is and how it works, explores the differences between authentication and authorization, and addresses OIDC versus SAML. Last but not least, you will be able to get a better understanding of OlDC in action with the example of Traefik Enterprise and an OIDC provider.
What is OpenID Connect (OIDC)?
OpenID Connect is an open protocol for authentication that was developed by a group of independent security experts. OIDC allows clients to request and receive the verified identity and basic information of end-users who request to access HTTPS-protected endpoints from an authorization server.
OpenID Connect was released in 2014 and is the latest version of the protocol, following OpenID 2.0, which was released in 2007. OIDC expands the capabilities of the previous version by providing an API-friendly environment that developers can use to develop web, native, and mobile applications.
Authentication vs. authorization
Before exploring OIDC any further, let's take a moment to go into a bit more detail about the differences between authentication and authorization.
Authentication is the process of verifying the identity of the user, using passwords, one-time pins, security codes (usually generated via an authentication app), or biometrics (fingerprints, voiceprints, eye scans, etc.). This process is always visible to the user. During the authentication process, user data is moved via ID tokens.
Authorization is the process of allowing users to access specific resources or functions. Security teams maintain the authorization process, which is not visible to the end-user. During this process, user data is moved via access tokens.
Now that these two basic concepts are clarified, it's time to address two of the most confusing topics:OIDC vs. SAML and OAuth vs. OIDC.
OIDC vs. SAML
OIDC and SAML are both identification protocols. SAML is significantly older than OIDC, as it was first developed in 2001, but this is not the only difference between the two protocols. While OIDC uses JSON web tokens (JWTs), SAML relies on heavier XML-based tokens. SAML also requires high levels of pre-configuration, keeping system users under tight control. OIDC, on the other hand, works with any provider that supports the protocol.
These two differences, and mainly the level of control, are why SAML is the most popular choice for enterprise-grade applications; however, it remains pretty cumbersome in meeting the needs of consumer and native mobile apps. In contrast, OIDC works best for consumer and native mobile apps and can be configured and expanded to serve enterprise-grade applications.
OAuth2 vs. OIDC
OAuth2 is the latest version of the authorization protocol OAuth. OAuth and OIDC are both open standards, but they are not interchangeable — they complement each other. OIDC is an authentication protocol — verifying a user is who they say they are — while OAuth deals with resource access control.
An OAuth client provides authorization flows for web, desktop, and mobile applications but does not access user information. OIDC is built on OAuth, and its authorization flows, to provide an authentication layer by transmitting the identification information of the application user.
How does OpenID Connect work?
Now that you better understand the main concepts surrounding the OIDC protocol, let's look at how OIDC works. OpenID Connect adds authentication to the OAuth authorization protocol by implementing the same components and architecture as OAuth. The main components found in OIDC are:
- ID tokens
- Access tokens
- Standardized scopes
- Flows
ID tokens vs. access tokens
You can consider ID tokens the equivalent of ID cards in real life. OIDC uses JWTs that contain user information, such as name, date of birth, email, etc. Contrary to the ID tokens used in OIDC, access tokens used in OAuth do not contain any identifying user information. The process of receiving an ID token is almost the same as obtaining an access token in OAuth, but with a distinct difference.
Access tokens are obtained through an automatic process that happens between systems. In contrast, ID tokens are obtained only when a human gives explicit consent, allowing a system to access all the user information required.
Standardized scopes
With standardized scopes, OIDC takes the basic concept of OAuth scopes one step further. OAuth uses tokens and scopes to implement recess control. The token determines the user's permission, and the scope defines what the user can do with this permission. These scopes, however, are not standardized in OAuth, which means that the application must determine for which resources the client can request access.
In OIDC, scopes are more clearly defined. A Userlnfo Endpoint is a protected resource defined by OIDC which contains user info and can be requested through standardized scopes. It's worth noting here that clients can use OIDC standardized scopes as well as OAuth scopes at the same time.
Flows
As you might guess, flows are the unique order in which a client obtains an access token in OAuth. OIDC flows build upon OAuth flows and define the response type of an authorization request and how to return tokens to the client. There are two distinct types of OIDC flows: authorization code flow and implicit flow.
Authorization code flow vs. implicit flow
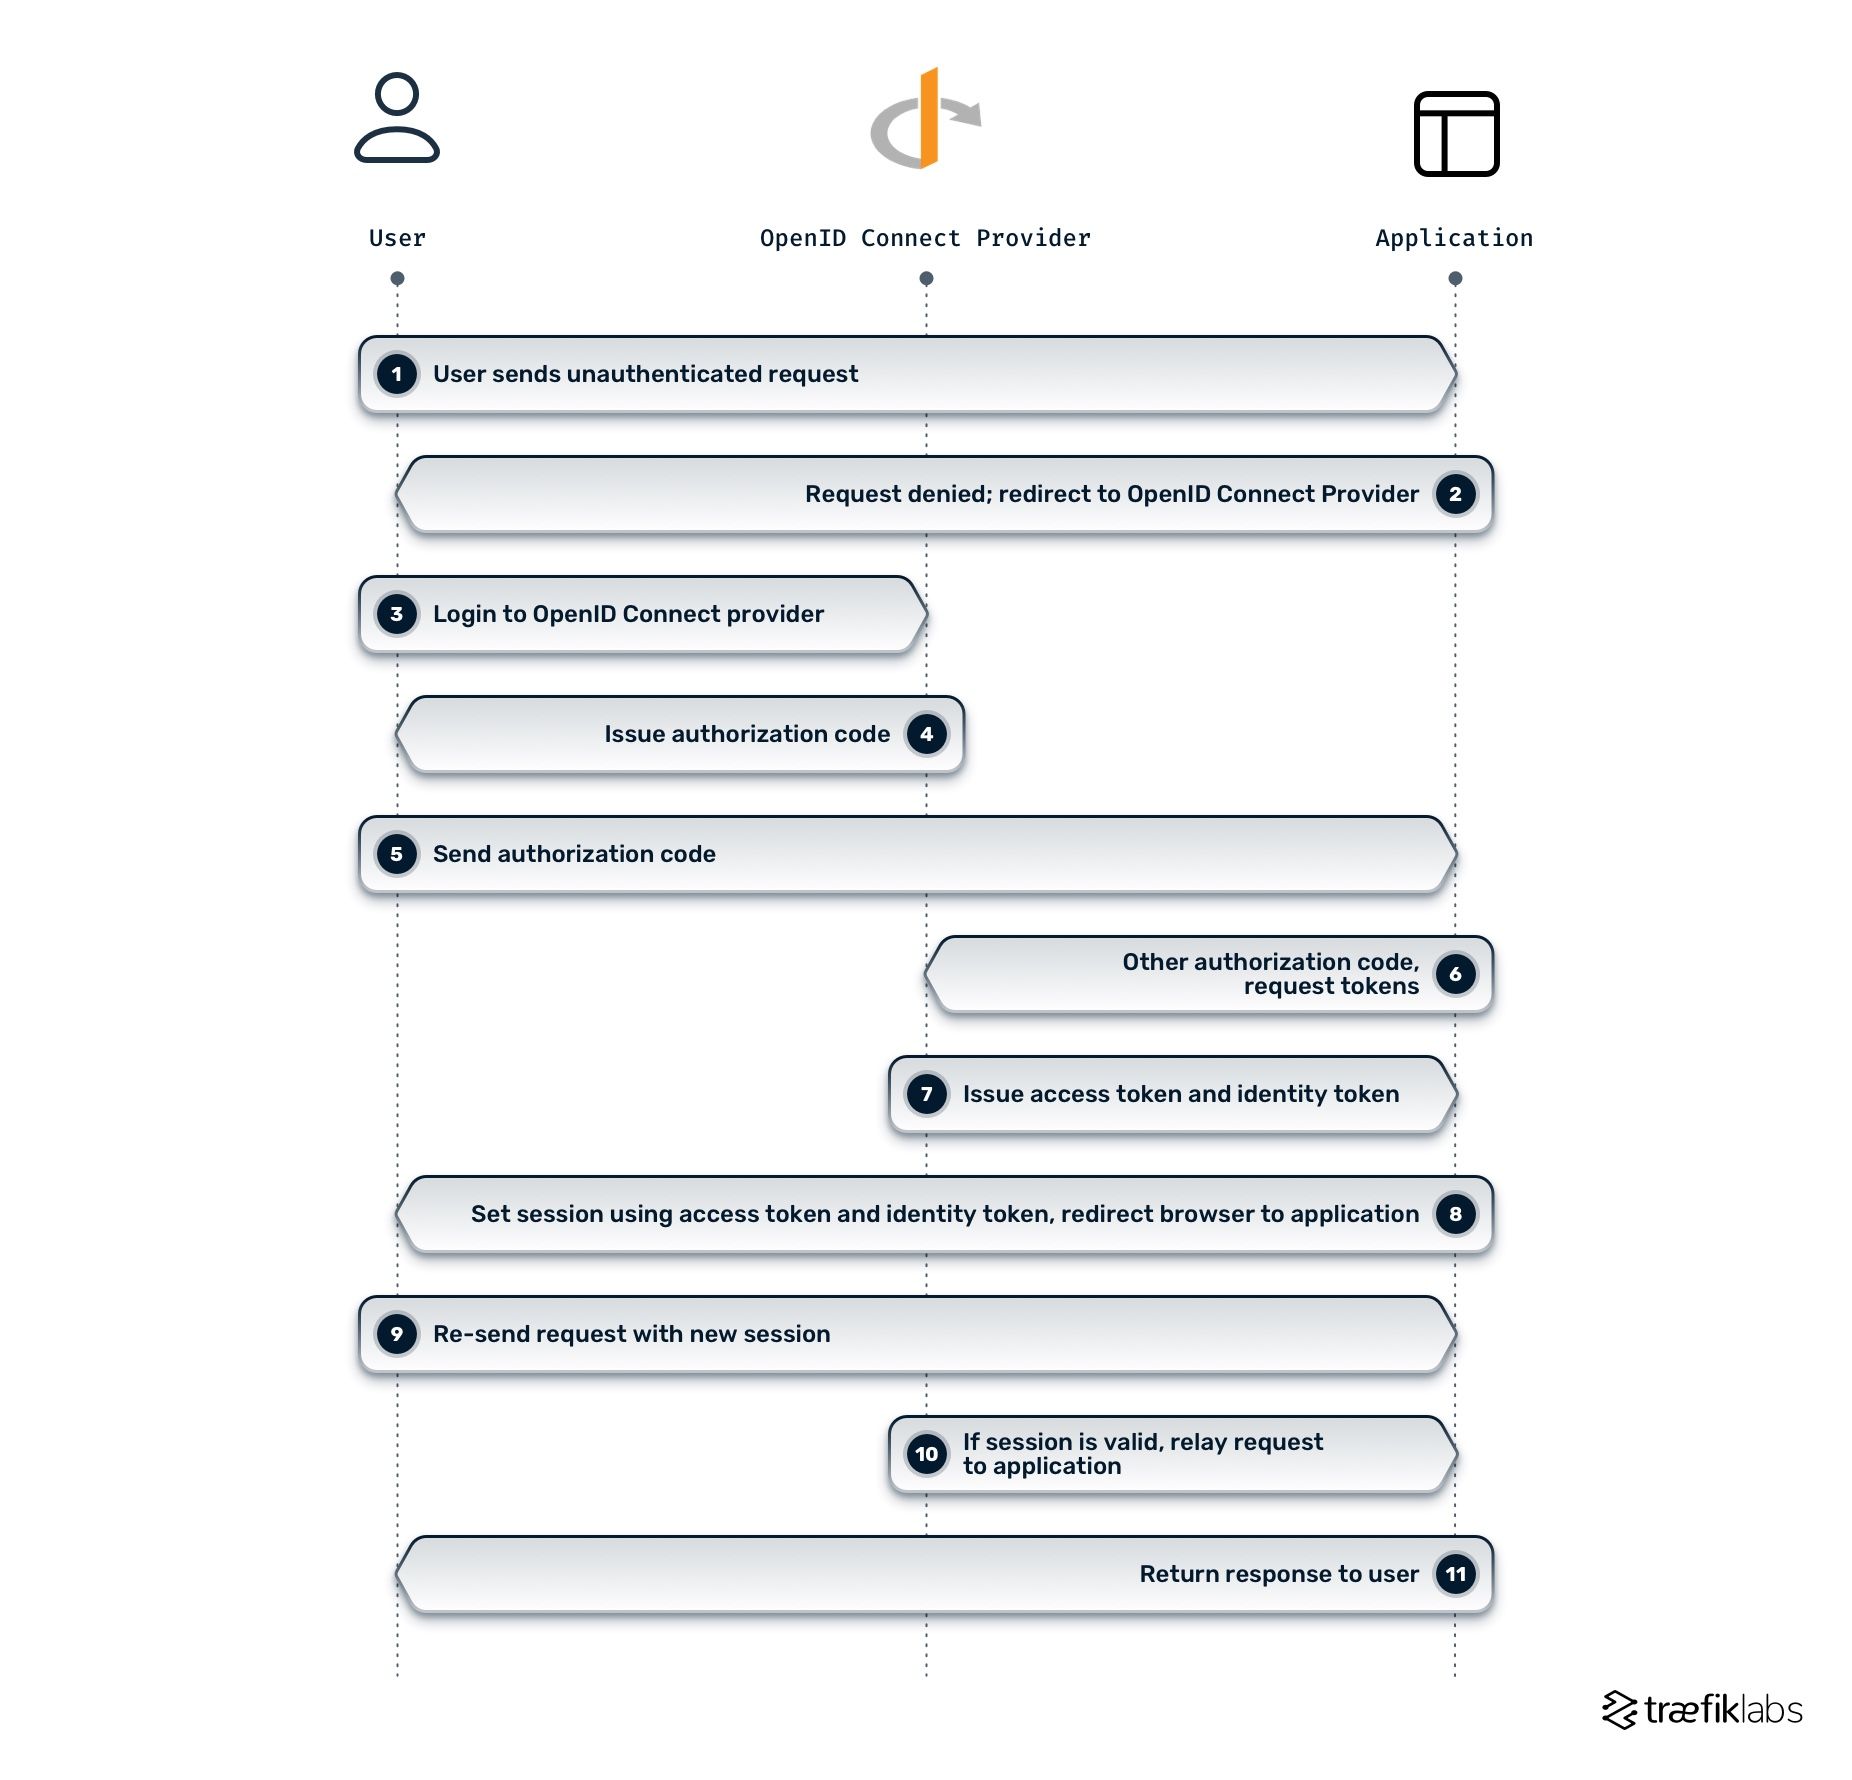
With the authorization code flow, you can request an authorization code from the authorization endpoint. This code can be exchanged for an ID token at the token endpoint.

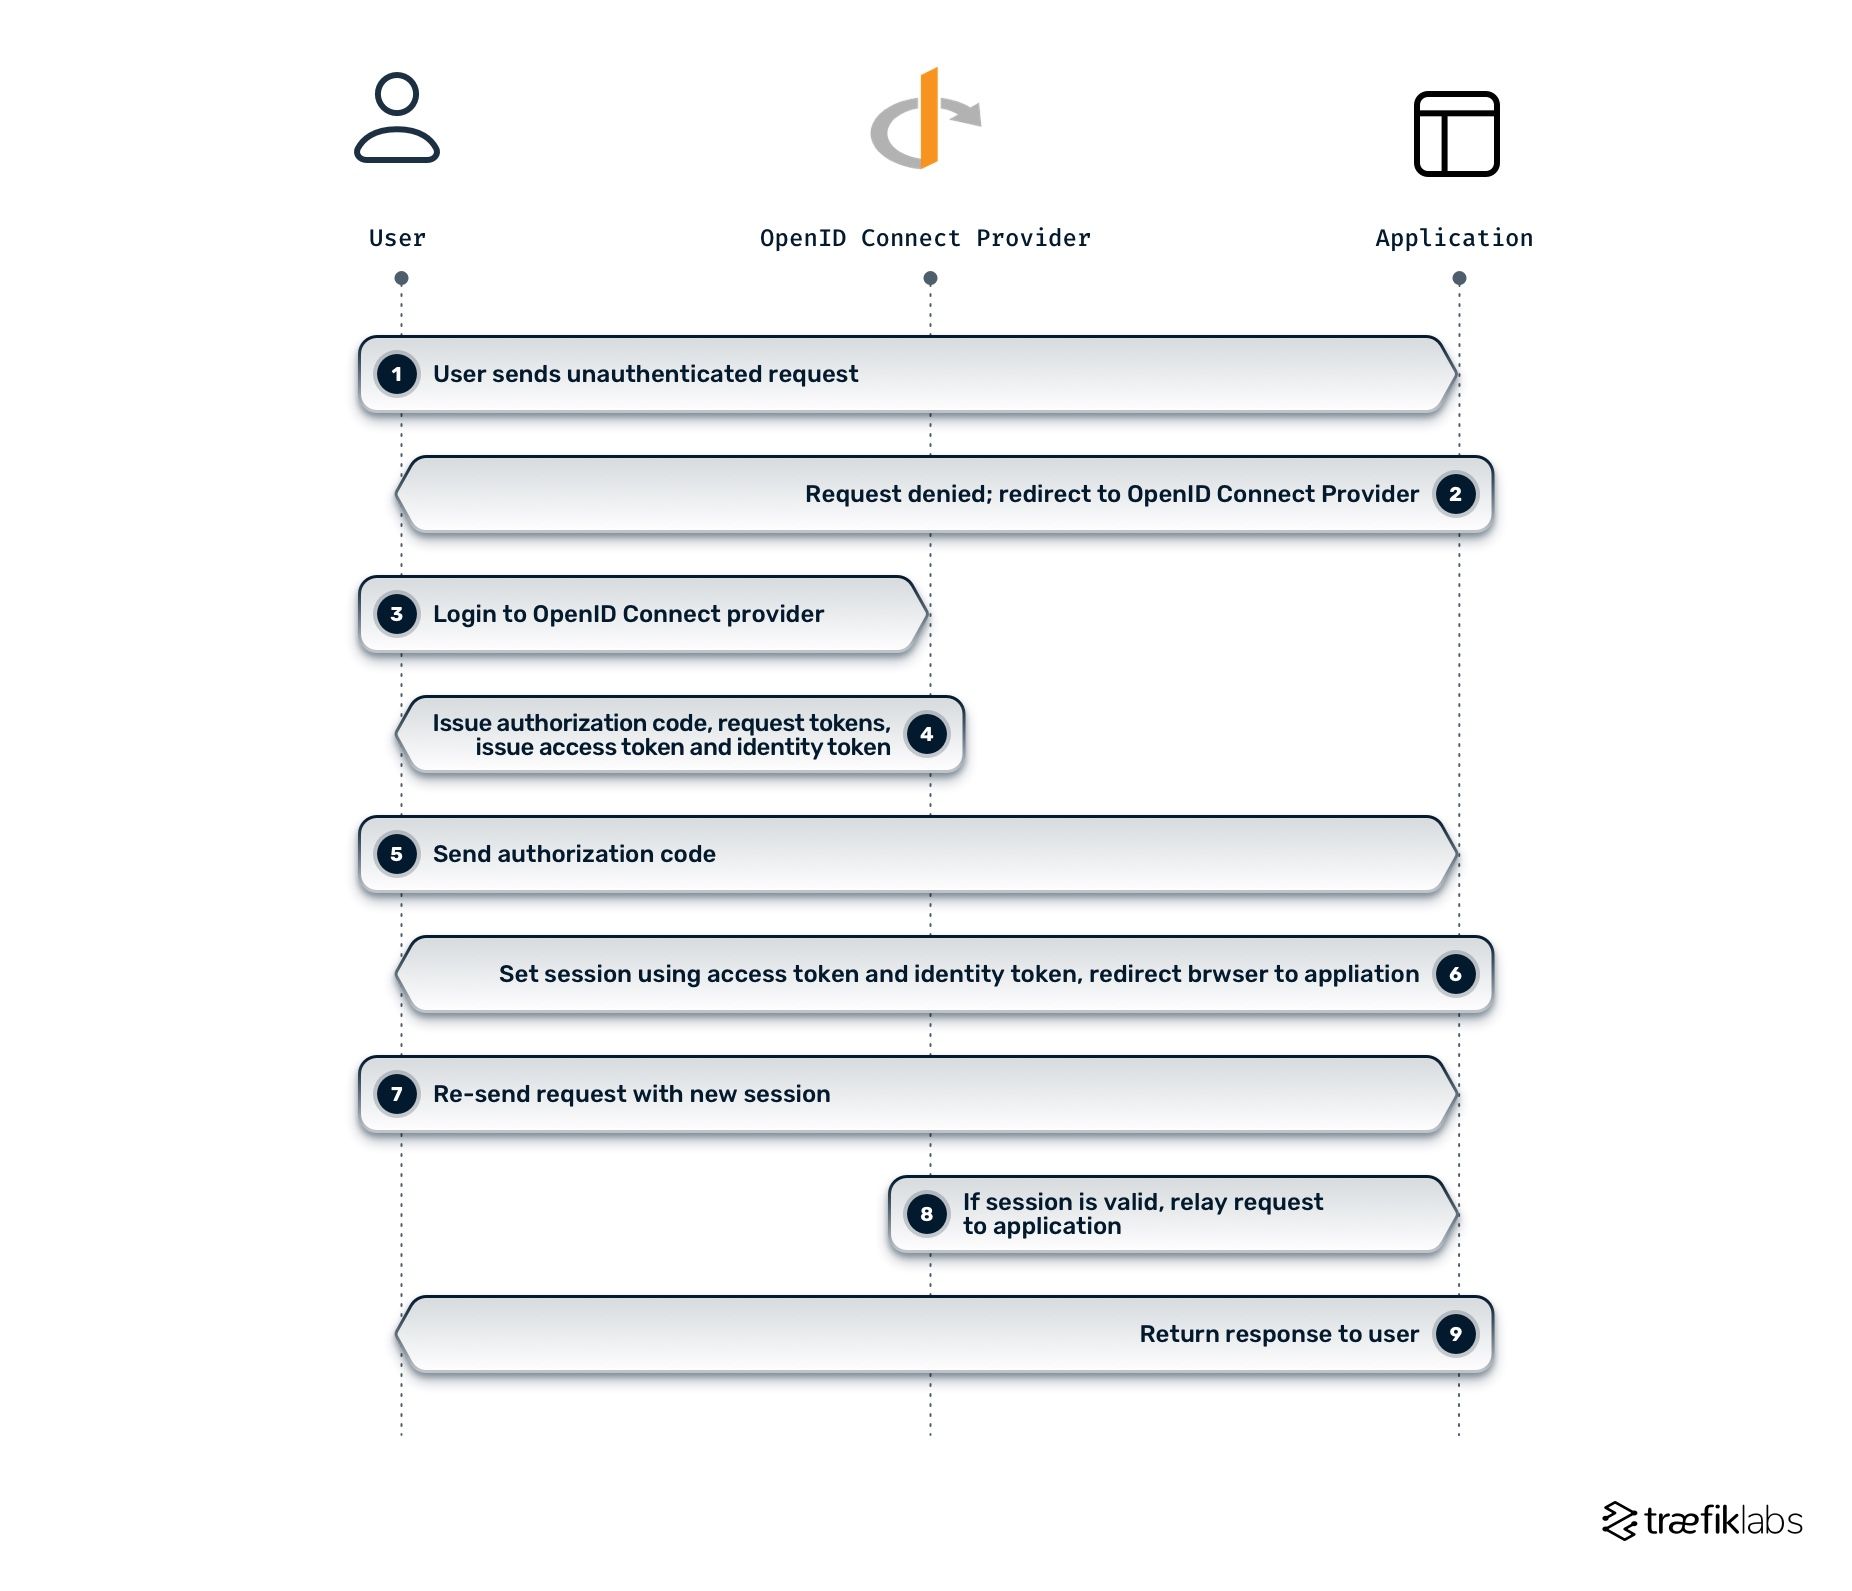
In the implicit flow, ID tokens can be requested at the authorization endpoint. In other words, steps 6 and 7 of the authorization code flow (as seen in the diagram above) are included in step 4.

OpenID Connect middleware and why you need it
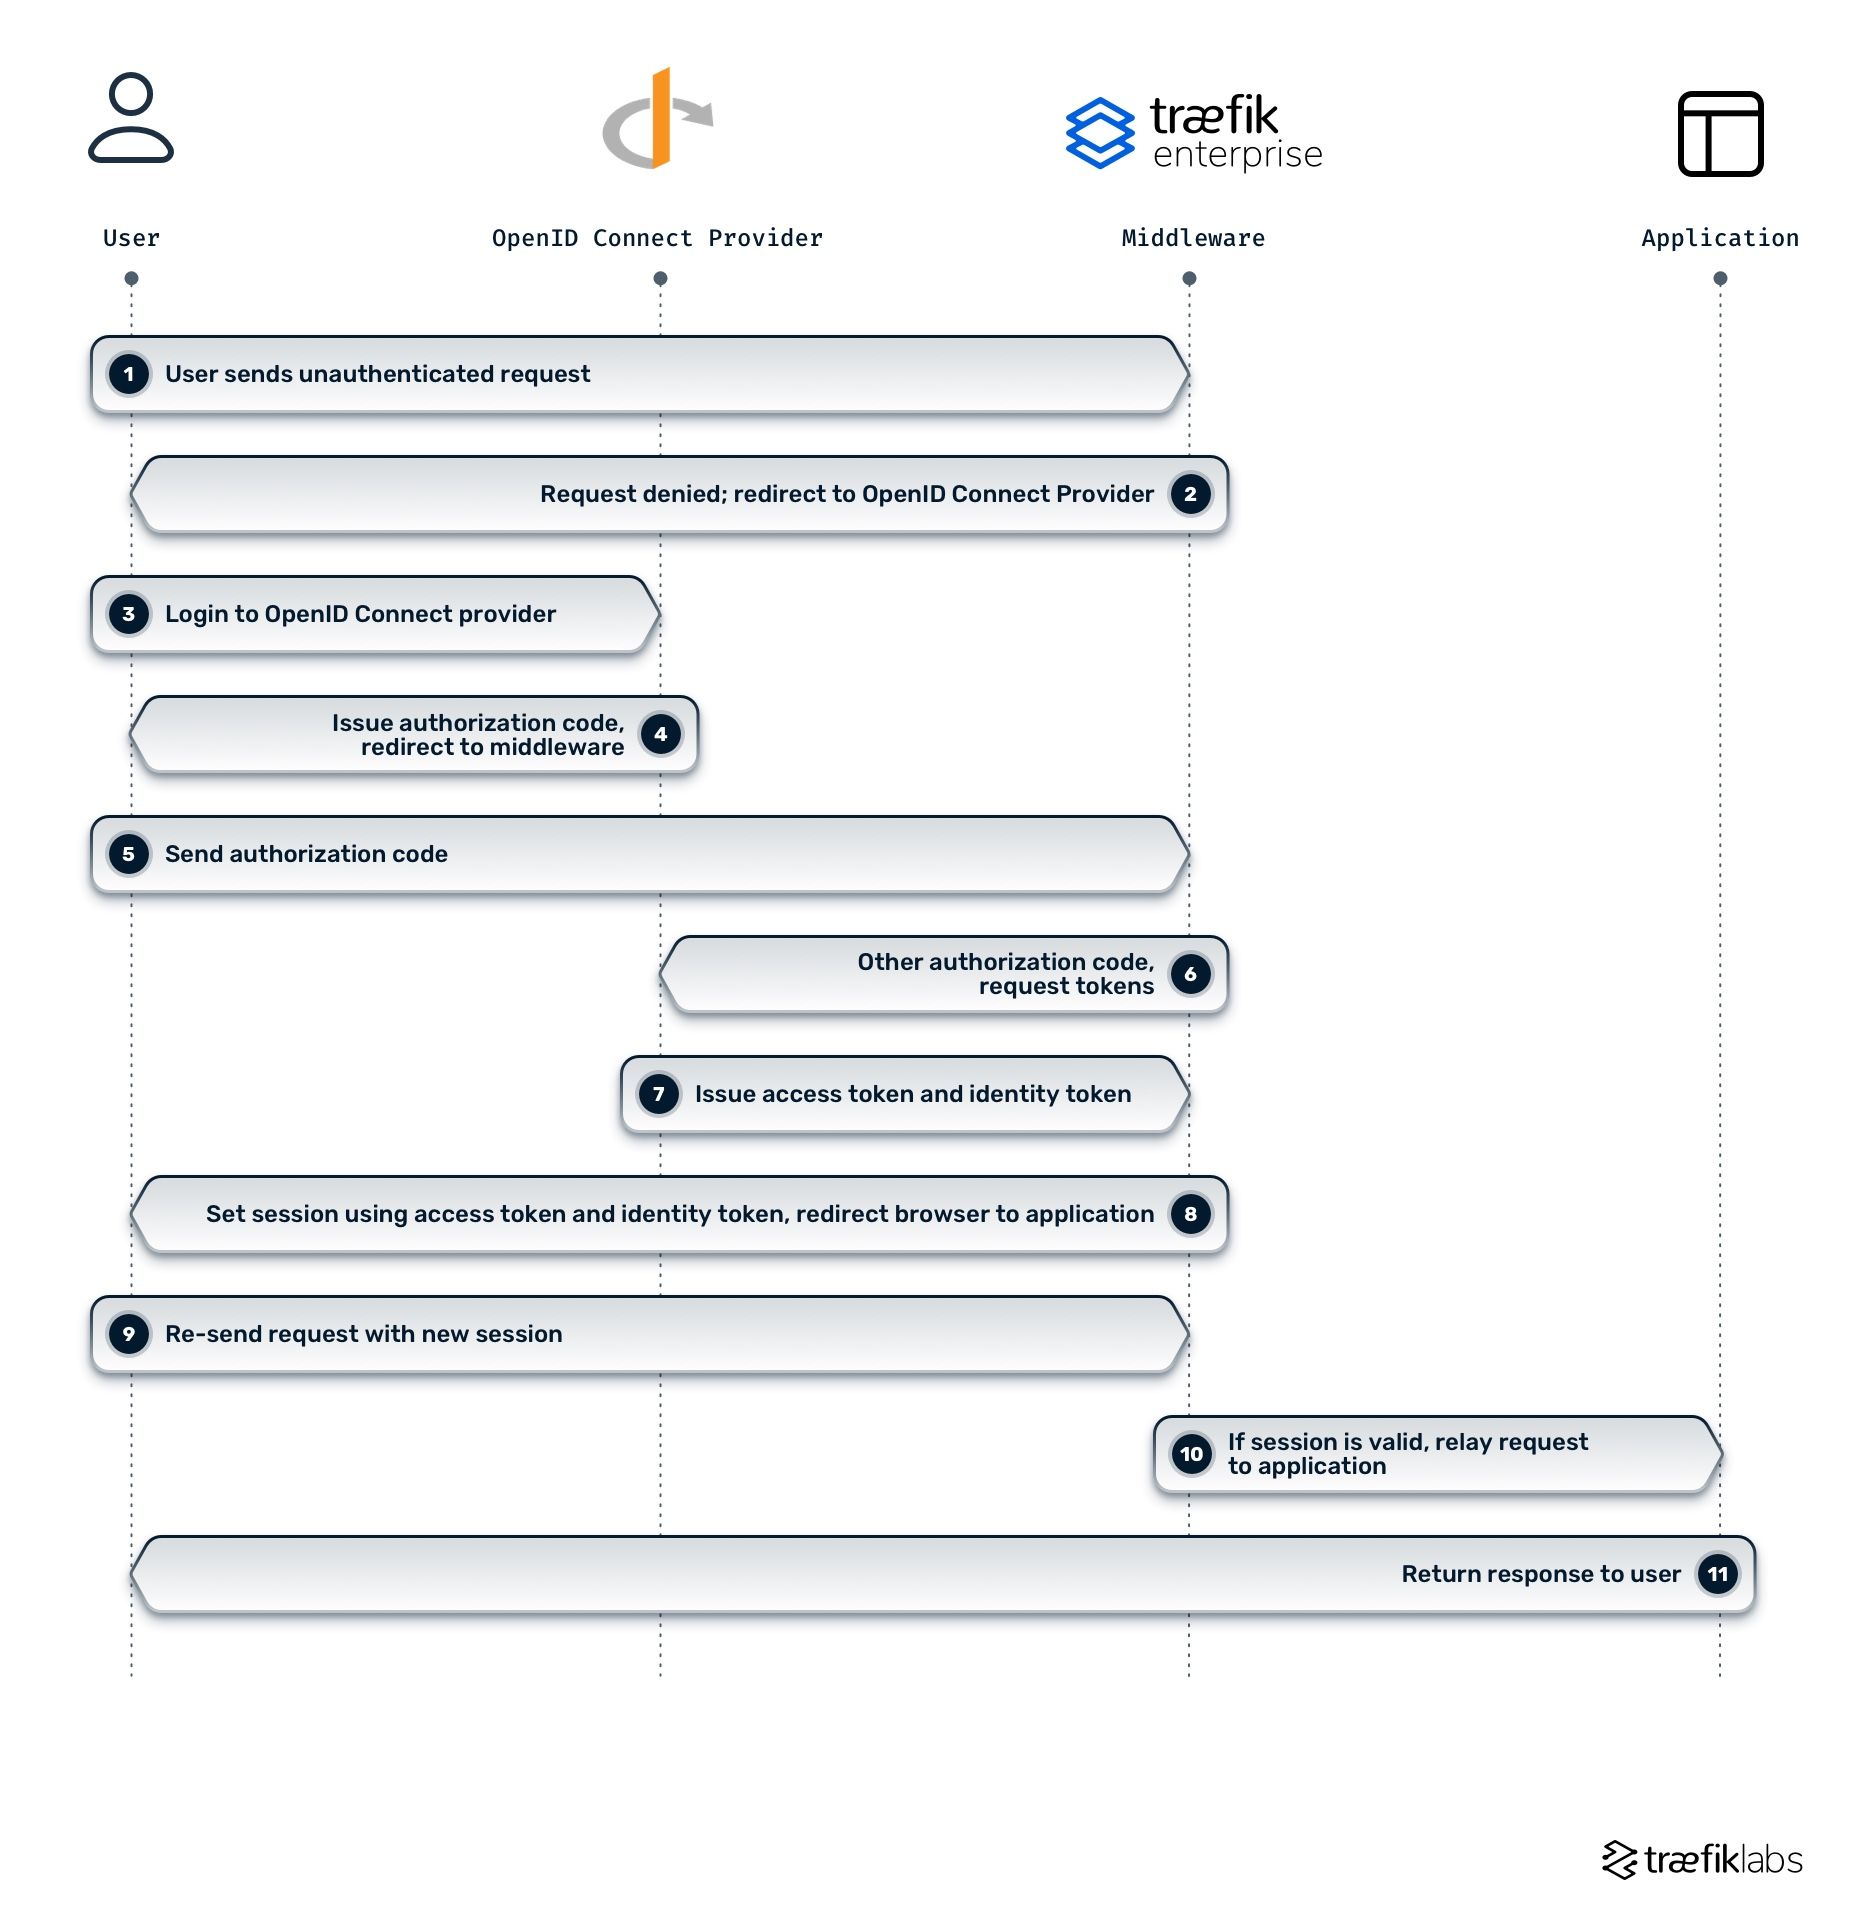
OpenID Connect middleware delegates the authentication process to an external provider (e.g., Google Accounts, GitHub, etc.) and obtains the user's session claims and scopes for authorization, helping you secure your applications. The diagram below demonstrates how the OpenID Connect authentication middleware works in Traefik Enterprise and where it lives in your system architecture.

The Traefik Enterprise OIDC middleware authenticates users by redirecting requests through the authentication provider. When the authentication process is complete, users are redirected back to the middleware before being authorized to access the upstream application.
Traefik Enterprise with an OIDC provider
To better understand how OIDC applies in a working example, let's take a look at how you can set up an OIDC provider with Traefik Enterprise.
This example assumes three basic steps:
- You have deployed Traefik Enterprise using one of the installation methods:
- You have deployed and configured any authentication service that supports OIDC — e.g., Keycloak, Okta, Google, etc. Keycloak is the authentication service provider used in this example.
- You have deployed a basic application. In this example, you'll see the
whoamisample application. You can find the source code here.
Once you're all set with the steps above, you can see that everyone can visit the application and see the headers displayed by the whoami application. The next step is to protect that application by deploying OpenID Connect Middleware.
Adding authentication source to the Traefik Enterprise static configuration
Before deploying OpenID connect middleware, you have to add an authentication source to the Traefik Enterprise static configuration. Depending on how you deployed Traefik Enterprise, there are a few ways to achieve that. You can use the teectl command to update the static configuration or manually update a config map with your static configuration.
The following lines should be added to the static configuration:
authSources:
  oidcSource:
    oidc:
      issuer: "https://keycloak.demo.traefiklabs.tech/auth/realms/traefiklabs"
      clientID: "demo-app" # your client-id
      clientSecret: "YOUR_SECRET"
Once the static configuration has been updated, Traefik Enterprise can reach an identity provider, and you can move forward with creating the OIDC middleware.
The OIDC middleware
The following command creates the middleware oidc-auth in the default namespace with its initial configuration.
cat >> EOF | kubectl apply -f -
apiVersion: traefik.containo.us/v1alpha1
kind: Middleware
metadata:
  name: oidc-auth
  namespace: default
spec:
  plugin:
    oidcAuth:
      source: oidcSource
      scopes:
        - openid
      redirectUrl: "/callback"
      session:
        name: "%s-session"
        path: "/"
        secret: powpowpowpowpowpowpowpow
        expiry: 86400
      forwardHeaders:
        X-Traefik-Group: groups
      claims: Contains(`groups`, `admin`)
EOF
Applying the middleware to Ingressroute
Once the middleware has been created, you can modify your existing Ingressroute resources by adding the OIDC middleware.
cat << EOF | kubectl apply -f -
apiVersion: traefik.containo.us/v1alpha1
kind: IngressRoute
metadata:
  name: whoami-crd-https
  namespace: default
spec:
  entryPoints:
    - websecure
  routes:
    - kind: Rule
      match: Host(`whoami.demo.traefiklabs.tech`)
      services:
        - kind: Service
          name: whoamiv1
          port: 80
      middlewares:
        - name: oidc-auth
  tls:
    certResolver: le
EOF
The middleware is now correctly applied. When you visit the same URL, you should be first redirected to your identity provider, in this case, Keycloak. On the Keycloak page, you are prompted to enter your login credentials. Once Keycloak successfully authenticates you, you are redirected back to the whoami application, and you should be able to see the content. The identity provider will not prompt you again to fill out your credentials until your session expires or the provider revokes the granted privileges.
You can validate the configuration by accessing the whoami application.
Summary
This article scratched only the surface of this vast topic that is OpenID connect. The concept of a unified digital identification system revolutionized how applications authenticate and authorize users and how they communicate this information among different applications, architectures, etc.
And although it is not that complex to grasp what the simple concepts of authorization and authentication represent, the complexity of how these two work together in layers and interlinks does not make it easy for everyone to follow and learn the capabilities and functionalities of OIDC in-depth.
References and further reading
- Centralizing Authentication & Authorization at the API Gateway with OpenID Connect
- Unlock the potential of data APIs with strong authentication and Traefik Enterprise
- Five ways to control access to your applications on Kubernetes
- Connect, Secure, and Monitor Microservices at Scale
- OpenID Connect middleware
- Enterprise best practices to expose and secure microservices and APIs


