Protect Your Applications with Google Cloud Armor and Traefik Proxy

Application security is a crucial — if not the most crucial — aspect of application development. Distributed denial of service (DDoS) and targeted web attacks, are two of the most common security threats and we get a lot of questions from users and customers on the best ways to protect applications against them.
A common solution is to apply a Web Application Firewall (WAF) in front of your services. Today, I will walk you through a quick tutorial on how to integrate Google Cloud Armor with Traefik Proxy on Google Cloud.
Why did I choose Google Cloud Armor, you ask? Cloud Armor offers protection for:
- DDoS attacks
- OWASP Top 10 Web Application Security Risks
- Traffic filtering based on IP, GEO metrics, and custom rules
Let’s briefly review what Google Cloud Armor is and how it solves these security challenges.
A quick introduction to Google Cloud Armor and Traefik Proxy
In a nutshell, Cloud Armor is able to inspect requests after the SSL termination has occurred. This takes place in Layer 7 which includes detailed information about the request, such as headers and cookies. This process makes it possible to apply pre-configured rules that protect applications from vulnerabilities and exploits, like SQL injection, cross-site scripting (XSS), and many others referenced in the OWASP Top 10 list.
Traefik proxy is a modern reverse proxy and load balancer that integrates with your existing infrastructure components and configures itself automatically and dynamically.
In this article, I want to show you how to take advantage of Google Cloud Armor on Traefik Proxy and present a basic use case. What I’ll show you in this tutorial is only one of many possible integrations of Traefik Proxy with Cloud Armor.
Note: Security is a massive topic and this article is by no means an exhaustive tutorial in application security. For the sake of this limited tutorial, I won’t be recommending any specific rules that should be applied to protect your applications and cloud environments. This is a topic better addressed by a security engineer. Here, we’ll only see how to integrate two technologies and have some fun!
Prerequisites for this hands-on tutorial
Google Cloud Armor works perfectly with Traefik Proxy. But to make it work, it requires a few crucial configuration changes to be applied. As prerequisites I assume that you have the following components installed and configured:
- GKE (Google Kubernetes Engine) cluster deployed that can be accessible by using
kubectl gcloudCLI command to easily interact with GCP by using CLI command
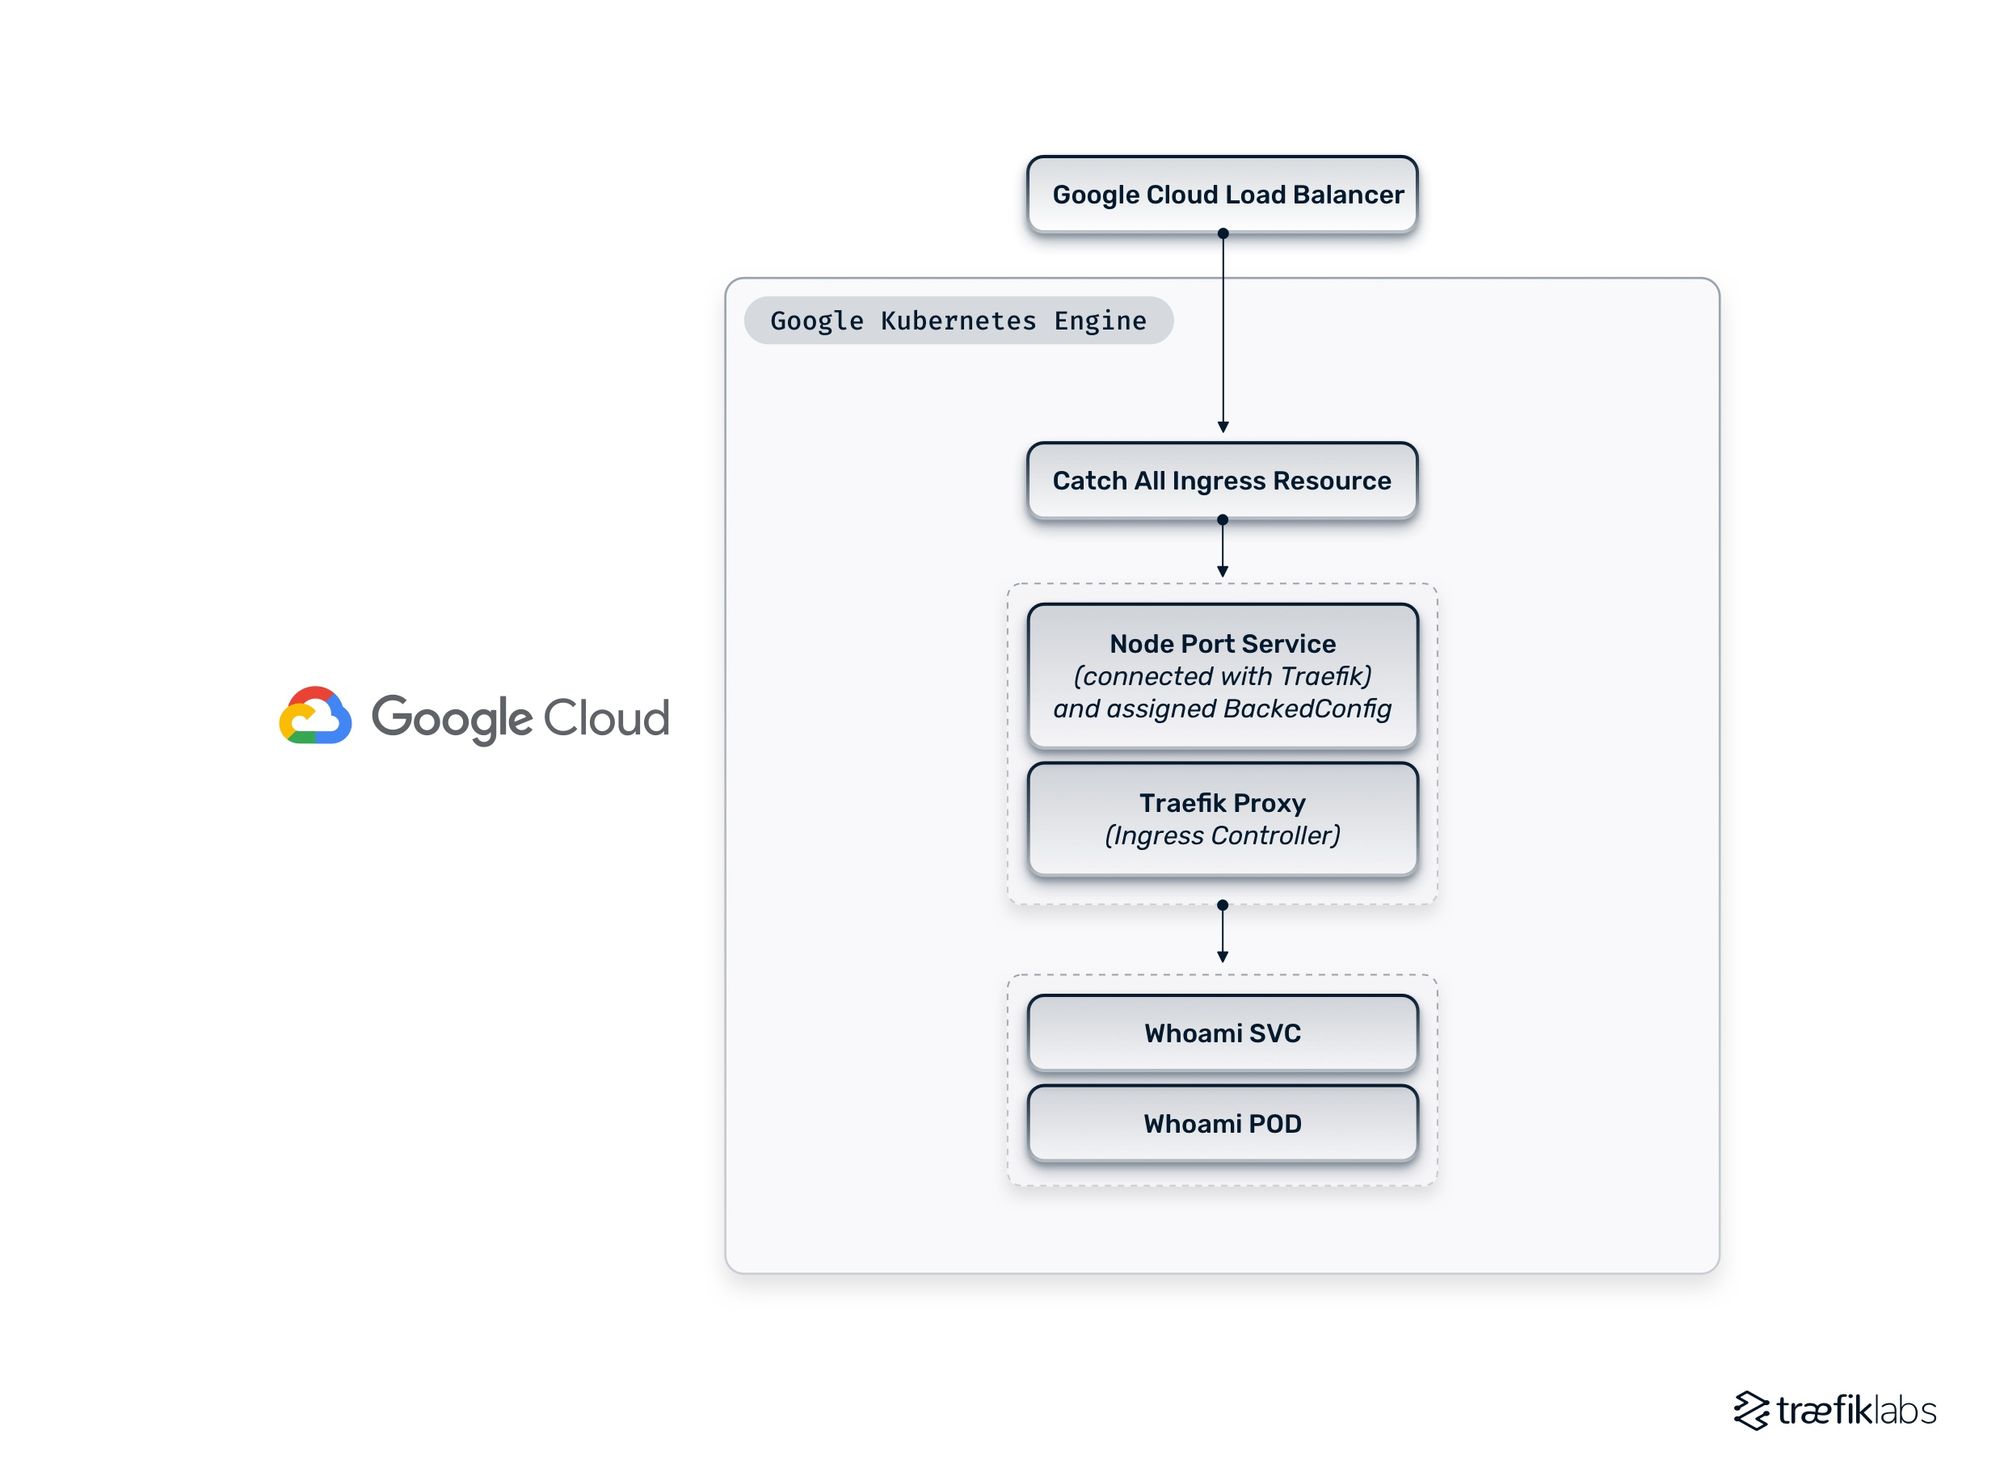
The entire stack will be deployed on GKE, and I will create the following resources that are presented in the diagram below.
Now that you’re all set, let’s move on to the next step and deploy Traefik Proxy as the ingress controller.
Deploying Traefik Proxy through the Helm Chart
As the first step, we need to deploy Traefik Proxy by using the official Helm chart while customizing the original configuration values.
Let’s add a Helm repository:
helm repo add traefik https://helm.traefik.io/traefik
And then run a command to update the chart repository we have just added:
helm repo update
The next step will be deploying Traefik Proxy by using the official Helm chart. Make sure that conext is correctly set up and KUBECONFIG points to the valid configuration to interact with the GKE cluster. It is always a good practice to display in your prompt the cluster name you are currently connected to or to manually check that by executing the command:
kubectl get nodes
Here is the response:
❯ kubectl get nodes
NAME                                       STATUS   ROLES    AGE     VERSION
gke-cluster-1-default-pool-3767b589-g4xr   Ready    <none>   5m42s   v1.21.10-gke.2000
gke-cluster-1-default-pool-3767b589-l3wx   Ready    <none>   5m41s   v1.21.10-gke.2000
gke-cluster-1-default-pool-3767b589-qm1b   Ready    <none>   5m42s   v1.21.10-gke.2000
So, you are now connected to the newly provisioned cluster and we can prepare the values for the Helm Chart.
Note: For the purpose of this tutorial, all of the resources — Traefik Proxy, Services, and example Whoami application — will be deployed in the default namespace. In a production environment, it is always a good practice to deploy services in separate namespaces.
The following values should be added to the values.yaml:
ingressClass:
  enabled: true
  isDefaultClass: false

additionalArguments:
  - "--providers.kubernetesingress.ingressclass=traefik"
  - "--ping"

providers:
  kubernetesCRD:
    enabled: true

ports:
  web:
    port: 8000
    expose: true
    exposedPort: 80
    protocol: TCP
    nodePort: 32080

  websecure:
    port: 8443
    expose: true
    exposedPort: 443
    protocol: TCP
    nodePort: 32443

service:
  enabled: true
  type: NodePort
Let’s have a look at the configuration file I prepared.
I am going to create the ingressClass but I will not set the ingressClass as default, so each time when I’m adding any Ingress resource I have to explicitly mention the ingressClass name.
In additionalArguments I add a rule that only Ingress objects using the previously created IngressClass=traefik should be tracked by Traefik Proxy. This is an important configuration otherwise you may end up with some redirection loops.
I also ensure that Kubernetes CRD is enabled, which are the custom resources Traefik Proxy uses to create traffic routing rules.
The service section is crucial. Change the default LoadBalancer service to NodePort and in the next steps, assign a custom annotation that will be referring to backenconfig configuration. That backendconfig resource connects a Cloud Armor rule (it will be created in the next section) with Traefik Proxy. It also applies that rule to port 80 which is the port where Traefik Proxy is listening on. More details will be provided in the next section.
Once the initial values.yaml is created, run the following command to deploy Traefik Proxy on the GKE cluster:
helm upgrade —-install traefik traefik/traefik -f values.yaml
This will take a moment or two. Once it is finished, add the description to the service that has been created.
The next step is to obtain a static global IP address. That IP address will be used to expose your stack to the internet through Google Load Balancer. The following command can be executed to get the IP address:
gcloud compute addresses create cloud-aromor-traefik-how-to --global
Get the IP address by using the following command:
❯gcloud compute addresses list --filter "name=cloud-aromor-traefik-how-to"
NAME                         ADDRESS/RANGE  TYPE      PURPOSE  NETWORK  REGION  SUBNET  STATUS
cloud-aromor-traefik-how-to  35.190.51.189  EXTERNAL
Now that you have the IP address, you can move forward and create a catch-all Ingress. To create a catch-all Ingress use the following code snippet:
apiVersion: networking.k8s.io/v1
kind: Ingress
metadata:
  name: catch-all-ingress
  annotations:
    kubernetes.io/ingress.global-static-ip-name: "cloud-aromor-traefik-how-to"
spec:
  defaultBackend:
    service:
      name: traefik
      port:
        number: 80
That Ingress resource created a defaultBackend and redirects everything to Traefik Proxy running on a port 80. By adding a custom annotation kubernetes.io/ingress.global-static-ip-name you can specify the IP address created in the previous step.
Once that resource is created you can watch the events (kubectl get events) and validate the IP address is assigned to the catch-all Ingress resource.
Logs:
0s          Normal    Create                      service/traefik                                 Created NEG "k8s1-c0ec4a4b-default-traefik-80-5251da3e" for default/traefik-k8s1-c0ec4a4b-default-traefik-80-5251da3e--web/80-web-GCE_VM_IP_PORT-L7 in "europe-central2-a".
0s          Normal    Attach                      service/traefik                                 Attach 1 network endpoint(s) (NEG "k8s1-c0ec4a4b-default-traefik-80-5251da3e" in zone "europe-central2-a")
1s          Normal    Sync                        ingress/catch-all-ingress                       UrlMap "k8s2-um-d35tnyqk-default-catch-all-ingress-phgyv58b" created
0s          Normal    Sync                        ingress/catch-all-ingress                       TargetProxy "k8s2-tp-d35tnyqk-default-catch-all-ingress-phgyv58b" created
0s          Normal    Sync                        ingress/catch-all-ingress                       ForwardingRule "k8s2-fr-d35tnyqk-default-catch-all-ingress-phgyv58b" created
0s          Normal    IPChanged                   ingress/catch-all-ingress                       IP is now 35.190.51.189
Now you can validate what your resource looks like.
❯ kubectl get ing
NAME                CLASS     HOSTS                    ADDRESS         PORTS   AGE
catch-all-ingress   <none>    *                        35.190.51.189   80      59m
The previous step created a classic HTTP/HTTPS load balancer in GCP. The load balancer uses a health check endpoint to ensure the backend is working correctly before adding it to its target list.
Updating the load balancer healthcheck
To ensure your backend — in this case Traefik Proxy — is healthy, you need to create a dedicated endpoint in Traefik Proxy to check its condition. To do that, you need to expose the /healthcheck endpoint and update the request path to use that endpoint in the load balancer you have created in GCP.
For this purpose, use the built-in PING feature. Here is the router that makes the /heatlhcheck endpoint reachable through the WEB entrypoint:
apiVersion: traefik.containo.us/v1alpha1
kind: IngressRoute
metadata:
  name: traefik-healtcheck
spec:
  entryPoints:
  - web
  routes:
  - kind: Rule
    match: PathPrefix(`/healthcheck`)
    services:
    - kind: TraefikService
      name: ping@internal
Once the router is created, you have to update the healtcheck on GCP. You can use the gcloud command to achieve that.
gcloud compute health-checks update http \
--request-path "/healthcheck" k8s1-c0ec4a4b-default-traefik-80-5251da3e
You have now updated the HTTP healtcheck and its request path from / to /healthcheck. By updating the healthcheck Google Load Balancer will get the 200 HTTP response and will assume that the backend (Traefik Proxy) is healthy and ready to accept the incoming HTTP requests.
Note: Make sure to update the Load Balancer because in your case the name will be different. You can get the name of the load balancer by executing the command gcloud compute health-checks list, or by manually navigating to the Console and finding the name of the load balancer.
Once those steps are completed you can validate the annotations which have been added to our Ingress object.
❯ kubectl get ing catch-all-ingress -o json |jq '.metadata.annotations'
{
  "ingress.kubernetes.io/backends": "{\"k8s1-c0ec4a4b-default-traefik-80-5251da3e\":\"HEALTHY\"}",
  "ingress.kubernetes.io/forwarding-rule":
"k8s2-fr-d35tnyqk-default-catch-all-ingress-phgyv58b",
  "ingress.kubernetes.io/target-proxy": "k8s2-tp-d35tnyqk-default-catch-all-ingress-phgyv58b",
  "ingress.kubernetes.io/url-map": "k8s2-um-d35tnyqk-default-catch-all-ingress-phgyv58b",
  "kubectl.kubernetes.io/last-applied-configuration": "{\"apiVersion\":\"networking.k8s.io/v1\",\"kind\":\"Ingress\",\"metadata\":{\"annotations\":{\"kubernetes.io/ingress.global-static-ip-name\":\"cloud-aromor-traefik-how-to\"},\"name\":\"catch-all-ingress\",\"namespace\":\"default\"},\"spec\":{\"defaultBackend\":{\"service\":{\"name\":\"traefik\",\"port\":{\"number\":80}}}}}\n",
  "kubernetes.io/ingress.global-static-ip-name": "cloud-aromor-traefik-how-to"
}
GKE injects the name of the load balancer and the healthcheck status. This is very useful for monitoring the Ingress through time.
Adding a basic Cloud Armor Policy
The next step creates a test Cloud Armor security rule. This test rule will trace the User Agent and block any requests presenting a User Agent as Godzilla. You also need to add a rule to block users originating from specific regions, based on the region code.
In the GCP console, navigate to Cloud Armor and create the policy rule called armor-rule-1 consisting of the following policies:
- The first rule with the lowest priority will allow everything and enable adaptive protection
- The second rule in the same policy will block the request by throwing the 403 HTTP response for that specific condition:
request.headers['user-agent'].contains('Godzilla') - The other rule will reject the requests coming from a specific country based on the country code:
origin.region_code == 'RU'
The easiest way to create those rules is to use the gcloud CLI command. Here is the code you’ll need:
- Create the Google Cloud Armor policy called armor-rule-1.
gcloud compute security-policies create armor-rule-1 \
--description "policy for testing Traefik and Cloud Armor"
- Update the rule to allow everyone to access our website, this will have the lowest priority. Note: you can create the opposite policy to deny all requests and only whitelist those that should be accepted.
gcloud compute security-policies rules update 2147483647 \
--security-policy armor-rule-1 \
--description "allow everyone who pass all rules to visit the app" \
--action "allow"
- Update the rule and create a custom expression to check if a User Agent contains the Godzilla string — if so, deny that request by throwing the 403 HTTP response code.
gcloud compute security-policies rules create 1000 \
--security-policy armor-rule-1 \
--description "deny if useragent is Godzilla"  \
--expression="request.headers['user-agent'].contains('Godzilla')" \
--action "deny-403"
- Update the rule by adding an expression to check the country code if the request from the specified regions takes a specific action. Here, I am blocking requests by sending the 403 HTTP response.
gcloud compute security-policies rules create 1001 \
--security-policy armor-rule-1 \
--description "deny if the region code is RU"  \
--expression="origin.region_code == 'RU'" \
--action "deny-403"
Once the rule is created you can add the custom resource BackendConfig and refer that resource to the rule you have just created.
apiVersion: cloud.google.com/v1
kind: BackendConfig
metadata:
  name: backendconfig-armor-rule-1
spec:
  securityPolicy:
    name: "armor-rule-1"
Adding a custom backend annotation to the NodePort service
Once you create the backend configuration, you need to connect Cloud Armor and Traefik Proxy through the NodePort service you created while deploying Traefik. In order to do that you need to annotate the NodePort service by adding the specific annotation.
The easiest way to do that is use kubectl:
❯ kubectl annotate svc traefik "cloud.google.com/backend-config={\"ports\": {\"80\":\"backendconfig-armor-rule-1\"}}"
Here is the result of the kubectl get service traefik command. Please note the type of the service and the annotation:
❯ kubectl get svc traefik -ojson | jq '.metadata.annotations'
{
  "cloud.google.com/backend-config": "{\"ports\": {\"80\":\"backendconfig-armor-rule-1\"}}",
  "cloud.google.com/neg": "{\"ingress\":true}",
  "meta.helm.sh/release-name": "traefik",
  "meta.helm.sh/release-namespace": "default"
}
As you can see, the annotation you defined has been correctly added to the NodePort Traefik service.
Deploying a test application to validate the configuration
Now you can deploy a test application and ingress that will enforce those rules.
---
kind: Deployment
apiVersion: apps/v1
metadata:
  name: whoamiv1
  labels:
    name: whoamiv1
spec:
  replicas: 1
  selector:
    matchLabels:
      task: whoamiv1
  template:
    metadata:
      labels:
        task: whoamiv1
    spec:
      containers:
        - name: whoamiv1
          image: traefik/traefikee-webapp-demo:v2
          args:
            - -ascii
            - -name=FOO
          ports:
            - containerPort: 80
          readinessProbe:
            httpGet:
              path: /ping
              port: 80
            failureThreshold: 1
            initialDelaySeconds: 2
            periodSeconds: 3
            successThreshold: 1
            timeoutSeconds: 2
---

apiVersion: v1
kind: Service
metadata:
  name: whoamiv1
spec:
  ports:
    - name: http
      port: 80
  selector:
    task: whoamiv1
Congratulations! You have just created the deployment whoamiv1 and exposed it within the cluster with a Kubernetes service object.
The next step is to create an Ingress resource that will expose your application to everyone.
apiVersion: networking.k8s.io/v1
kind: Ingress
metadata:
  name: whoami-http-ing
  annotations:
    traefik.ingress.kubernetes.io/router.entrypoints: web
spec:
  ingressClassName: traefik
  rules:
    - host: w.35.190.51.189.nip.io
      http:
        paths:
          - path: /
            pathType: Prefix
            backend:
              service:
                name: whoamiv1
                port:
                  number: 80
Note: Since I’m exposing the service through Traefik Proxy, I added the Traefik annotation to specify the entrypoint, which in this case is WEB and IngressClassName.
You can validate the created resource by executing the following command:
❯ kubectl get ingresses
NAME                CLASS     HOSTS                    ADDRESS         PORTS   AGE
catch-all-ingress   <none>    *                        35.190.51.189   80      60m
whoami-http-ing     traefik   w.35.190.51.189.nip.io                   80      15s
All seems in order and you are now free to move forward and test your configuration!
Let’s do some testing
The most straightforward way to test is to use the CURL command. Execute the following command without specifying headers:
❯ curl w.35.190.51.189.nip.io

  _____    ___     ___
 |  ___|  / _ \   / _ \
 | |_    | | | | | | | |
 |  _|   | |_| | | |_| |
 |_|      \___/   \___/

GET / HTTP/1.1
Host: w.35.190.51.189.nip.io
User-Agent: curl/7.79.1
Accept: */*
Accept-Encoding: gzip
Via: 1.1 google
X-Cloud-Trace-Context: d0d1c8ad830fe1a97ebc70d958473a6b/15730230428199051765
X-Forwarded-For: 35.191.11.137
X-Forwarded-Host: w.35.190.51.189.nip.io
X-Forwarded-Port: 80
X-Forwarded-Proto: http
X-Forwarded-Server: traefik-7ccb7fbcc6-sfmxt
X-Real-Ip: 35.191.11.137
If you got a response that includes the headers, it means that your application works fine and you were not blocked by any rules you have created in Google Cloud Armor.
The next step is to add the User Agent header to match the test policy you created a few lines above:
❯ curl -vi -H "User-Agent: Godzilla" w.35.190.51.189.nip.io

*   Trying 35.190.51.189:80...
* Connected to w.35.190.51.189.nip.io (35.190.51.189) port 80 (#0)
> GET / HTTP/1.1
> Host: w.35.190.51.189.nip.io
> Accept: */*
> User-Agent: Godzilla
>

HTTP/1.1 403 Forbidden
Content-Type: text/html; charset=UTF-8

Date: Mon, 09 May 2022 15:14:53 GMT

<
* Connection #0 to host w.35.190.51.189.nip.io left intact
<!doctype html><meta charset="utf-8"><meta name=viewport content="width=device-width, initial-scale=1"><title>403</title>403 Forbidden%
Works fine! You got a 403 response which means your request was blocked as expected.
What are the next steps?
Having that kind of configuration allows you to send all incoming requests through a catch-all Ingress that is connected with the Traefik service. On the service, you added annotations that refer to the backend config and the security policies created in Cloud Armor.
I highly recommend going through the Google Cloud Armor documentation. There are a lot of things to explore in order to build adaptive security and protect the application from malicious attacks.
Here, I was using the Google Cloud Armor security policies to create rules and learn more about custom expressions
I would also recommend visiting the Traefik Proxy documentation to explore many more ways to configure to build robust environments. For example, how about adding rate limits to protect your API? Visit our Community Forum and tell us all about your use cases!


