Load Balancing High Availability Clusters in Bare Metal Environments with Traefik Proxy


Anyone with experience operating systems knows the importance of high availability. Whether you’re a sysadmin managing a company’s infrastructure, an aficionado experimenting with home solutions, or even a student running home labs for coursework, the goal is to prepare your system to mitigate or even prevent hardware failures or other lapses quickly and automatically. This becomes especially true for those operating bare metal environments. High availability means your system is resilient to outages, and it gives you the ability to quickly and easily roll out changes and upgrades.
Networking is the glue that keeps distributed systems together, and you will need to effectively load balance traffic between your clusters in order to gain high availability. In this article, we will show you how to load balance high availability clusters in bare metal with Traefik Proxy. The scenario will be based on a high availability load balancer that uses Traefik Proxy and keepalived in a bare metal world. This will consist of two nodes acting as bare metal servers in an active/passive configuration. If one of the nodes fails, the other will take charge of handling the requests.
Here, I will walk you through this scenario and provide a proof-of-concept solution.
To reproduce the environments discussed in this tutorial, you will need its accompanying configuration files. These consist of a set of makefiles, Ansible playbooks, and Terraform snippets.
The tutorial and its accompanying files assume a Debian-based Linux system.
To create the test environment, you will need the following tools:
- A KVM host server (Ubuntu 20.04 or Debian 11)
- virsh (the CLI of libvirt))
- pip (the Python package installer)
- make (the standard build tool)
- git (for accessing repositories)
- curl (for downloading from the internet)
- unzip (for uncompressing downloaded archives)
- kubectl (the Kubernetes client)
- Terraform 0.13.3 or greater (for deploying the infrastructure in KVM)
- Packer 1.6.2 or greater (for creating VM templates)
- Ansible 2.9.13 or greater (for deploying applications and configurations)
Getting ready
If you don't have already a KVM solution in place, you can install one by following these instructions:
$ sudo apt install -y curl git software-properties-common gnupg2
$ sudo curl -fsSL https://apt.releases.hashicorp.com/gpg | sudo apt-key add -
$ sudo apt-add-repository "deb [arch=amd64] https://apt.releases.hashicorp.com focal main"
$ sudo curl -fsSLo /usr/share/keyrings/kubernetes-archive-keyring.gpg https://packages.cloud.google.com/apt/doc/apt-key.gpg
$ echo "deb [signed-by=/usr/share/keyrings/kubernetes-archive-keyring.gpg] https://apt.kubernetes.io/ kubernetes-xenial main" | sudo tee  /etc/apt/sources.list.d/kubernetes.list
$ sudo apt update
$ sudo apt install -y qemu-system libvirt-daemon-system libvirt-clients python3-pip make unzip wget kubectl terraform packer ansible


$ sudo ssh-keygen -q -t rsa -N '' -f /root/.ssh/id_rsa
$ sudo cp /root/.ssh/id_rsa /root/.ssh/id_rsa.pub ~/.ssh/. && sudo chown ${LOGNAME}: ~/.ssh/id_rsa*
$ sudo adduser ${LOGNAME} libvirt
$ logout/login
Clone the repository containing all deployment options:
$ git clone https://github.com/traefik-tech-blog/traefik-lb-expert-guide
$ cd traefik-lb-expert-guide
If you are testing on a newly installed lab environment, you could set up some security blocker with this command:
$ sudo make qemu-security
The target make myenv does everything for you. You can download them automatically by using the install-terraform-plugins makefile target from this guide's accompanying configuration files:
$ sudo make install-terraform-plugins
If you are not using a Debian derivative, you can run make myenv to install Terraform, the Terraform Libvirt Provider, the Terraform Ansible provisioner, Packer, and Ansible (with pip). This will download binaries in your local bin directory (~/.local/bin/).
The next step is to build the base image for all VMs that will be created for this guide and load it onto KVM.
In the makefile accompanying this tutorial, you can customize the following variables:
- LIBVIRT_HYPERVISOR_URI: the URI of your KVM instance (e.g.:
qemu+ssh://traefiker@mykvmsystem; default:qemu:///system) - LIBVIRT_IMAGES_POOL: the storage pool name to which you want to upload the base image (default:
template) - LIBVIRT_IMAGE_NAME: the name of the base image that will be uploaded (default:
debian10- traefik.qcow2) - ROOT_PASSWORD: the password for the image’s root account (temporary use for Packer to customize the image; default:
traefik) - SSH_IDENTITY: path to your SSH public key that you will use to connect to VMs
If you customize any of these makefile variables, you need to replace the default values with your own for each of the next few commands.
Now, run the makefile target to create the base image for all the Linux VMs used in this guide:
$ sudo make image
Note: Before starting to deploy the use cases in the next steps, you can also customize the virtual IP (VIP), the IPs of the VMs, and so forth in each terraform/clusterX.tfvars file.
Active/passive nodes
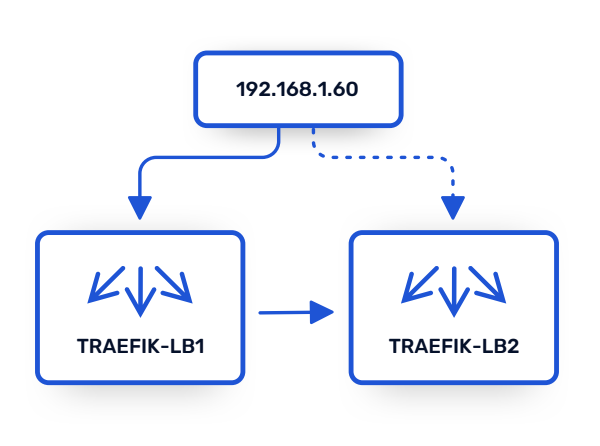
This use case explains how to set up keepalived as a high availability load balancer targeting Traefik Proxy. It exposes a simple backend that returns the name of the load balancer that handled the request.
Using keepalived makes it possible to have an active/passive setup, where one instance of Traefik is active at a time, but another will assume leadership if the first one goes down.
First, create the environment:
$ sudo make run-playbook CLUSTER=1
Once the script completes, you can test the environment by accessing the backend service:
$ curl http://192.168.1.60 -v 2>&1| grep X-Lb-Name
< X-Lb-Name: traefik-lb1
The output reveals that the request was handled by the first Traefik Proxy VM.
Now, observe what happens when you execute the following commands, which power down the active VM before trying the request again:
$ sudo virsh -c "<LIBVIRT_HYPERVISOR_URI>" destroy --domain traefik-lb1
Domain traefik-lb1 destroyed
$ curl http://192.168.1.60 -v 2>&1| grep X-Lb-Name
< X-Lb-Name: traefik-lb2
As expected, the output now shows that the second VM took over and is now handling the requests.
To complete the demonstration, restart the first VM:
$ virsh -c "<LIBVIRT_HYPERVISOR_URI>" start --domain traefik-lb1
Domain traefik-lb1 started
$ sleep 30 && curl http://192.168.1.60 -v 2>&1| grep X-Lb-Name
< X-Lb-Name: traefik-lb1
The environment has returned to its initial state, with the first VM handling requests once more.
To better understand what’s happening under the hood, connect to one machine using SSH and have a look at the following files:
The Traefik configuration:
/etc/traefik/traefik.toml: the static configuration/etc/traefik/dynamic_conf.toml: the dynamic configuration- http.middlewares.LBHeader.headers.customResponseHeaders: define a middleware that adds a custom header (X-Lb-Name)
- http.routers.router: middlewares = ["LBHeader"] tells Traefik to use the defined middleware
The keepalived configuration: /etc/keepalived/keepalived.conf
- vrrp_script is the script that will run frequently to check whether Traefik is up; it’s a simple curl
- vrrp_instance is where the configuration of the Virtual Router Redundancy Protocol (VRRP) is defined. Important parameters are:
- virtual_router_id: allows you to have multiple VRRP clusters in your network
- authentication: used by the members of a cluster to talk together
- virtual_ipaddress: the VIP address which will be added to the master node
The following commands demonstrate that only one machine owns the VIP:
$ ssh [email protected]
# ip addr | grep 192.168.1.60/24
inet 192.168.1.60/24 scope global secondary ens3
# logout
# ssh [email protected]
# ip addr | grep 192.168.1.60/24
# logout
As mentioned earlier, this example creates an active/passive load balancing setup. Using the same environment, you can also achieve a kind of active/active setup using DNS load balancing:
- Set up two VRRP instances
- Make the first one master on lb1
- Make the second one master on lb2
- Add each VIP in a DNS A record
And there you have it! You have successfully load balanced traffic between clusters using Traefik Proxy. Your bare metal environment has high availability, and you can roll out changes and upgrades quickly and easily. You can sleep well knowing it has resilience against outages!
Did you know you can also implement this use case with Traefik Enterprise? Doing so gives you access to advanced features such as rate limiting, stickiness, and canary deployments. It is helpful for enterprises deploying clusters in on-premise environments at scale. Check out our expert guide, Load Balancing High Availability Clusters with Traefik, to learn more.


