HTTPS on Kubernetes Using Traefik Proxy

Hello, and welcome!
If you're looking for the most efficient process of configuring HTTPS for your applications, you're in the right place.
In this article, I'll show you how to configure HTTPS on your Kubernetes apps using Traefik Proxy. Among other things, Traefik Proxy provides TLS termination, so your applications remain free from the challenges of handling SSL.
Before I jump in, let’s have a look at a few prerequisites. If you want to follow along with this tutorial, you need to have a few things set up first:
- A working Kubernetes cluster. The Traefik Labs team likes to use k3d for development and demonstrations. K3d creates a local Kubernetes cluster within Docker. It uses the K3s Kubernetes distribution, currently packaged with Traefik Proxy version 2.4.8. You also need to enable port forwarding for port 443. This is the port that allows us to handle HTTPS requests when using Traefik Proxy. Once you have k3d installed, you can spin up a cluster with this command:
$ k3d cluster create dash -p "443:443@loadbalancer"
- A public IP to host the cluster. The IP allows us to configure and verify various TLS specific features. When you see 20.115.56.189 used in this article, replace it with the public address for your own cluster. To avoid having to configure DNS, we'll use subdomains provided by the free and wonderful services of nip.io.
- The
kubectlcommand-line tool. Make sure you configure it to point to your cluster. If you created your cluster using K3d and the instructions above, this will already be done for you. - A Kubernetes Namespace named
dev.This is used for deploying your applications.
$ kubectl create namespace dev
HTTPS termination
HTTPS termination is the simplest way to enable HTTPS support for your applications. The termination process makes sure that all TLS exchange happens between the Traefik Proxy server and the end-user. When you do this, your applications remain focused on the actual solution they offer instead of also having to manage TLS certificates. In the following sections, we'll cover the scenarios of default certificates, manual certificates, and automatic certificates from Let's Encrypt.
Deploy application
Traefik Proxy handles requests using web and webscure entrypoints. HTTPS is enabled by using the webscure entrypoint. Create a whoami Kubernetes IngressRoute which will listen to all incoming requests for whoami.20.115.56.189.nip.io on the websecure entrypoint. Traefik performs HTTPS exchange and then delegates the request to the deployed whoami Kubernetes Service.
apiVersion: traefik.containo.us/v1alpha1
kind: IngressRoute
metadata:
  name: whoami
  namespace: dev
spec:
  entryPoints:
    - websecure
  routes:
  - kind: Rule
    match: Host(`whoami.20.115.56.189.nip.io`)
    services:
    - name: whoami
      port: 80
Deploy the whoami application, service, and the IngressRoute. You can find the whoami.yaml file here.
$ kubectl apply -f whoami.yaml
deployment.apps/whoami configured
service/whoami configured
ingressroute.traefik.containo.us/whoami configured
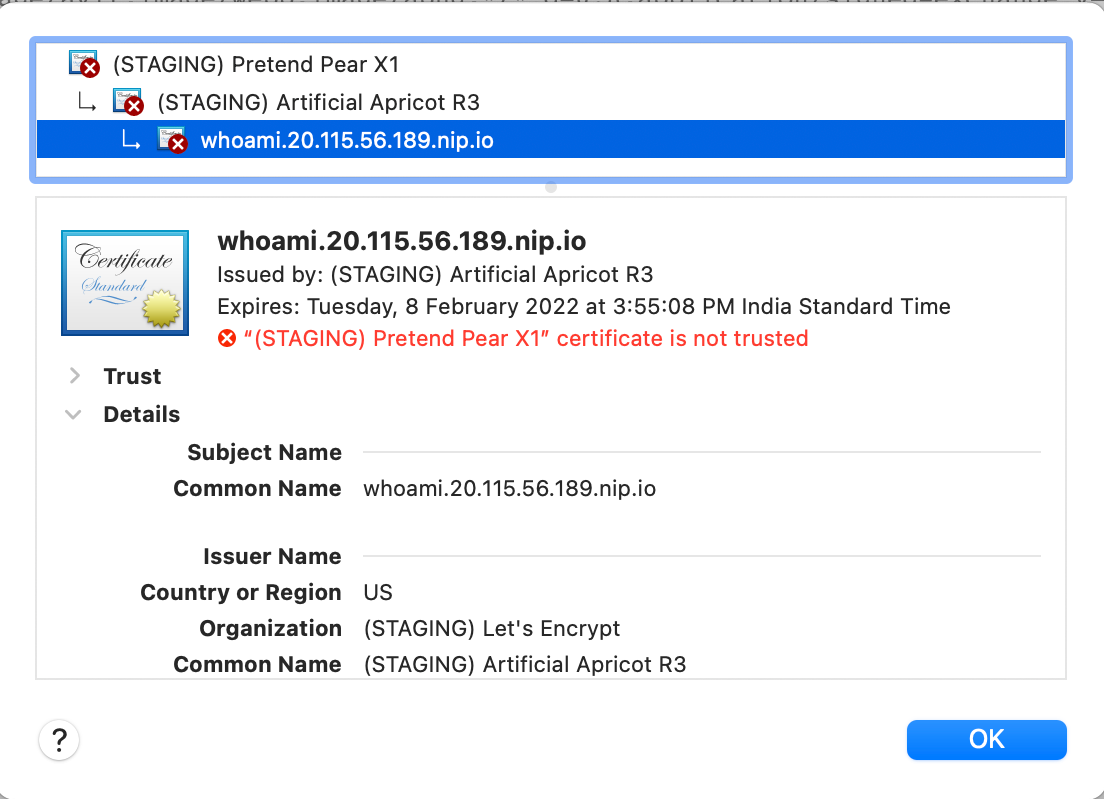
Open the application in your browser using a URL like https://whoami.20.115.56.189.nip.io (modifying the IP to reflect your public IP). The browser displays warnings due to a self-signed certificate. Accept the warning and look up the certificate details.
Alternatively, you can also use the following curl command.
$ curl -k -vI https://whoami.20.115.56.189.nip.io/
### Abridged for Brevity ###
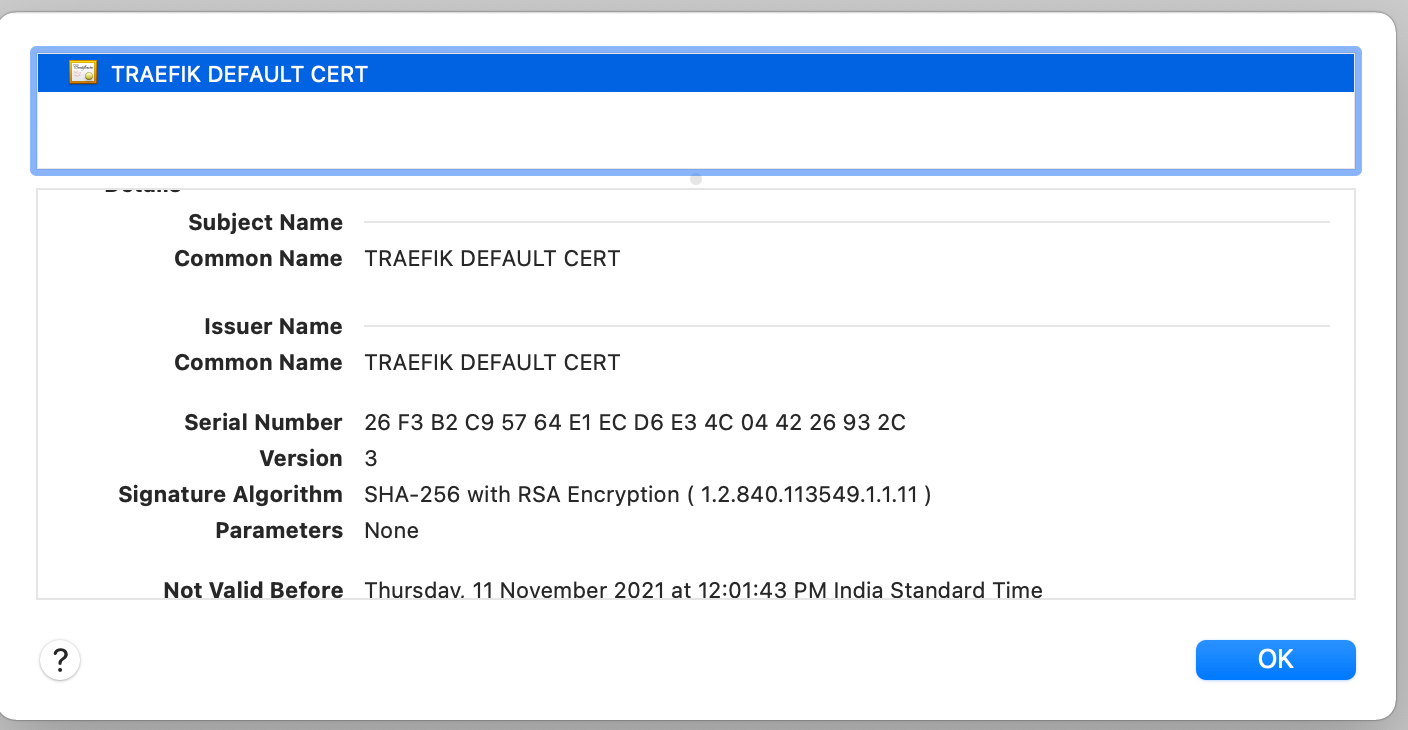
* Server certificate:
* subject: CN=TRAEFIK DEFAULT CERT
* start date: Nov 11 06:31:43 2021 GMT
* expire date: Nov 11 06:31:43 2022 GMT
* issuer: CN=TRAEFIK DEFAULT CERT
* SSL certificate verify result: unable to get local issuer certificate (20), continuing anyway.
As shown above, the application relies on Traefik Proxy-generated self-signed certificates — the output specifies CN=TRAEFIK DEFAULT CERT. The certificate is used for all TLS interactions where there is no matching certificate.
Manual certificates
When you have certificates that come from a provider other than Let's Encrypt (either self-signed, from an internal CA, or from another commercial CA), you can apply these certificates manually and instruct Traefik to use them. Each will have a private key and a certificate issued by the CA for that key. To demonstrate this scenario in Traefik, let's generate a self-signed certificate and apply it to the cluster.
Self-signed certificates
OpenSSL is installed on Linux and Mac systems and is available for Windows. It provides the openssl command, which you can use to create a self-signed certificate. Use the configuration file shown below to quickly generate the certificate (but be sure to change the CN and DNS.1 lines to reflect your public IP).
[ req ]
default_bits       = 2048
distinguished_name = req_distinguished_name
req_extensions     = req_ext
prompt = no
[ req_distinguished_name  ]
C = US
ST = VA
CN  = whoami.20.115.56.189.nip.io
[ req_ext ]
subjectAltName = @alt_names
[ alt_names ]
DNS.1 = whoami.20.115.56.189.nip.io
DNS.2 = whoami.127.0.0.1.nip.io
Traefik Proxy would match the requested hostname (SNI) with the certificate FQDN before using the respective certificate. You can generate the self-signed certificate pair in a non-interactive manner using the following command:
$ openssl req  -nodes -new -x509  -keyout server.key -out server.crt -config openssl.conf -days 365
Generating a 2048 bit RSA private key
................................................................................................................................................................................+++
..+++
writing new private key to 'server.key'
-----
Configure IngressRoute
Before we can update the IngressRoute to use the certificates, the certificate and key pair must be uploaded as a Kubernetes Secret with the following two attributes:
tls.crt: The certificate.tls.key: The non-encrypted private key. Traefik Proxy does not work with encrypted keys.
Create the Secret, using the following command:
$ kubectl create secret generic whoami-secret --from-file=tls.crt=./server.crt --from-file=tls.key=./server.key --namespace dev
secret/whoami-secret created
Update the IngressRoute and reference the Secret in the tls.secretName attribute.
apiVersion: traefik.containo.us/v1alpha1
kind: IngressRoute
metadata:
  name: whoami
  namespace: dev
spec:
  entryPoints:
    - websecure
  routes:
  - kind: Rule
    match: Host(`whoami.local`)
    services:
    - name: whoami
      port: 80
  tls:
    secretName: whoami-secret
Deploy the updated IngressRoute configuration and then open the application in the browser using the URL https://whoami.20.115.56.189.nip.io. The browser will still display a warning because we're using a self-signed certificate. Accept the warning and look up the certificate details.

Default certificates
If Traefik Proxy is handling all requests for a domain, you may want to substitute the default Traefik Proxy certificate with another certificate, such as a wildcard certificate for the entire domain. We do by creating a TLSStore configuration and setting the defaultCertificate key to the secret that contains the certificate.
apiVersion: traefik.containo.us/v1alpha1
kind: TLSStore
metadata:
  name: default
  namespace: default

spec:
  defaultCertificate:
    secretName: whoami-secret
Save that as default-tls-store.yml and deploy it.
$ kubectl apply -f default-tls-store.yml
Let's Encrypt certificates
In the section above we deployed TLS certificates manually. When working with manual certificates, you, as the operator, are also responsible for renewing and updating them when they expire. Alternatively, you can also configure Traefik Proxy to use Let's Encrypt for the automated generation and renewal of certificates.
We do that by providing additional certificatesresolvers parameters in Traefik Proxy static configuration. The certificatesresolvers specify details about the Let's Encrypt account, Let's Encrypt challenge, Let's Encrypt servers, and the certificate storage.
apiVersion: helm.cattle.io/v1
kind: HelmChartConfig
metadata:
  name: traefik
  namespace: kube-system
spec:
  valuesContent: |-
    additionalArguments:
      - "--log.level=DEBUG"
      - "[email protected]"
      - "--certificatesresolvers.le.acme.storage=/data/acme.json"
      - "--certificatesresolvers.le.acme.tlschallenge=true"
      - "--certificatesresolvers.le.acme.caServer=https://acme-staging-v02.api.letsencrypt.org/directory"
To avoid hitting rate limits or being banned from Let's Encrypt, we recommend that you use the acme-staging server for all non-production environments.
Save the configuration above as traefik-update.yaml and apply it to the cluster.
$ kubectl apply -f traefik-update.yaml
Configure IngressRoute
Although you can configure Traefik Proxy to use multiple certificatesresolvers, an IngressRoute is only ever associated with a single one. That association happens with the tls.certResolver key, as seen below:
apiVersion: traefik.containo.us/v1alpha1
kind: IngressRoute
metadata:
  name: whoami
  namespace: dev
spec:
  entryPoints:
    - websecure
  routes:
  - kind: Rule
    match: Host(`whoami.20.115.56.189.nip.io`)
    services:
    - name: whoami
      port: 80
  tls:
    certResolver: le
Make that change, and then deploy the updated IngressRoute configuration. Reload the application in the browser, and view the certificate details.
TLS options
Traefik Proxy provides several options to control and configure the different aspects of the TLS handshake. Several parameters control aspects such as the supported TLS versions, exchange ciphers, curves, etc. Take look at the TLS options documentation for all the details.
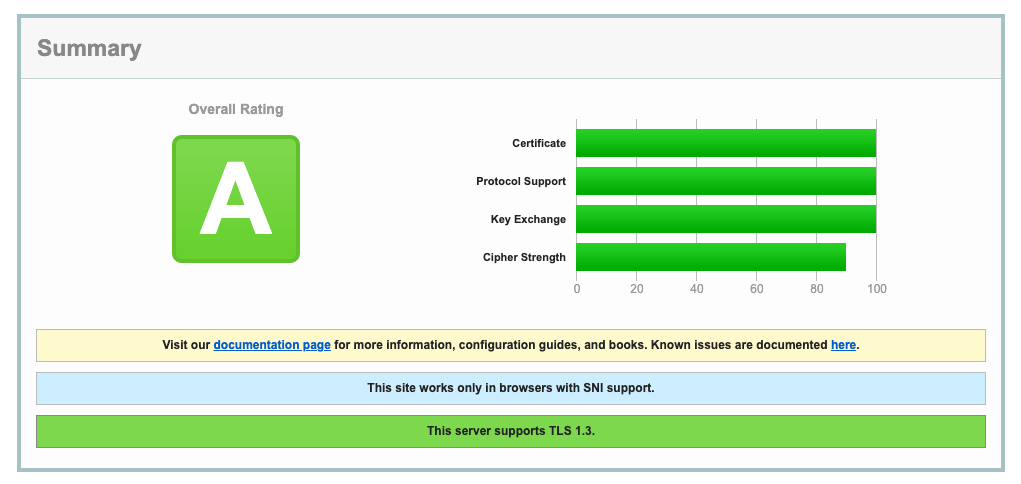
Before you enable these options, perform an analysis of the TLS handshake using SSLLabs. The SSLLabs service provides a detailed report of various aspects of TLS, along with a color-coded report.
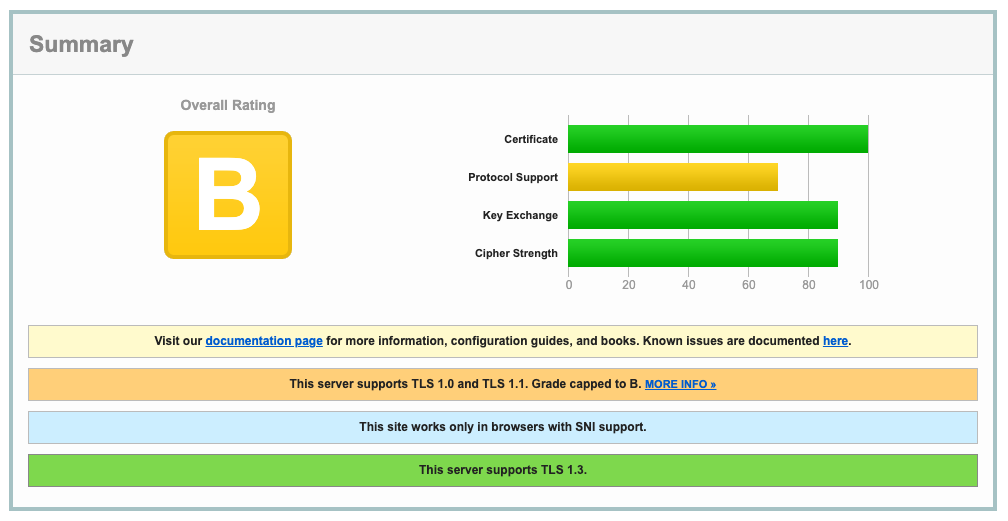
The above report shows that the whoami service supports TLS 1.0 and 1.1 protocols without forward secrecy key exchange algorithms.
An IngressRoute is associated with the application TLS options by using the tls.options.name configuration parameter. The below configuration defines a TLSOption resource with specific TLS and applies it to the whoami IngressRoute.
apiVersion: traefik.containo.us/v1alpha1
kind: TLSOption
metadata:
  name: tlsoptions
  namespace: dev
spec:
  minVersion: VersionTLS12
  cipherSuites:
    - TLS_ECDHE_ECDSA_WITH_AES_128_CBC_SHA256
    - TLS_ECDHE_ECDSA_WITH_AES_128_GCM_SHA256
    - TLS_ECDHE_RSA_WITH_AES_256_GCM_SHA384
    - TLS_ECDHE_RSA_WITH_CHACHA20_POLY1305
    - TLS_ECDHE_ECDSA_WITH_AES_256_GCM_SHA384
    - TLS_ECDHE_RSA_WITH_CHACHA20_POLY1305
    - TLS_ECDHE_ECDSA_WITH_CHACHA20_POLY1305
    - TLS_AES_256_GCM_SHA384
    - TLS_AES_128_GCM_SHA256
    - TLS_CHACHA20_POLY1305_SHA256
    - TLS_FALLBACK_SCSV
  curvePreferences:
    - CurveP521
    - CurveP384
  sniStrict: false
---
apiVersion: traefik.containo.us/v1alpha1
kind: IngressRoute
metadata:
  name: whoami
  namespace: dev
spec:
  entryPoints:
    - websecure
  routes:
  - kind: Rule
    match: Host(`whoami.20.115.56.189.nip.io`)
    services:
    - name: whoami
      port: 80
  tls:
    certResolver: le
    options:
      name: tlsoptions
      namespace: dev
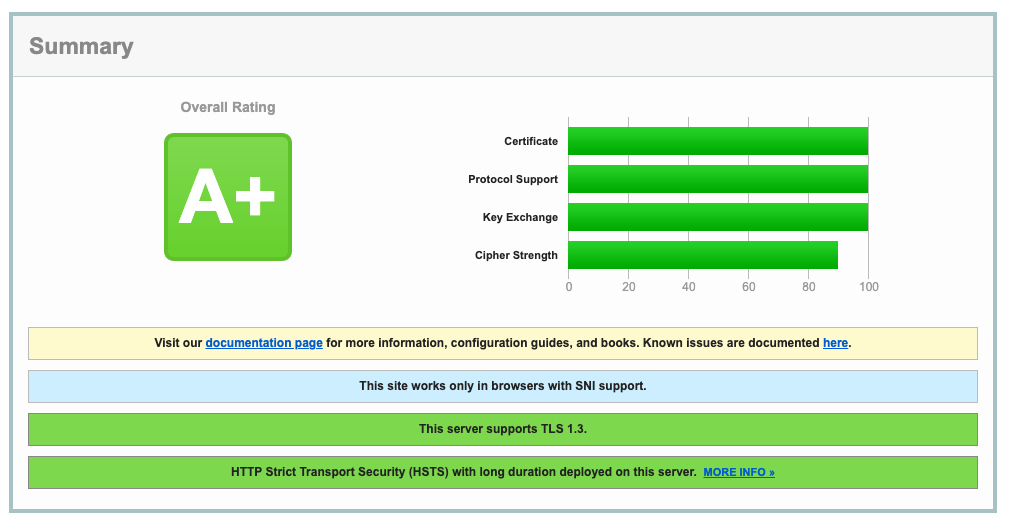
Deploy the updated configuration and then revisit SSLLabs and regenerate the report. The new report shows the change in supported protocols and key exchange algorithms.
To boost your score to A+, use Traefik Middleware to add security headers as described in the Traefik documentation.
apiVersion: traefik.containo.us/v1alpha1
kind: Middleware
metadata:
  name: security
  namespace: dev
spec:
  headers:
    frameDeny: true
    sslRedirect: true
    browserXssFilter: true
    contentTypeNosniff: true
    stsIncludeSubdomains: true
    stsPreload: true
    stsSeconds: 31536000
---
apiVersion: traefik.containo.us/v1alpha1
kind: IngressRoute
metadata:
  name: whoami
  namespace: dev
spec:
  entryPoints:
    - websecure
  routes:
  - kind: Rule
    match: Host(`whoami.20.115.56.189.nip.io`)
    services:
    - name: whoami
      port: 80
    middlewares:
    - name: security
  tls:
    certResolver: le
    options:
      name: tlsoptions
      namespace: dev
Apply this configuration to create the Middleware and update the IngressRoute, and then generate a new report from SSLLabs. The configuration now reflects the highest standards in TLS security.
HTTPS passthrough
In the section above, Traefik Proxy handles TLS, But there are scenarios where your application handles it instead. In such cases, Traefik Proxy must not terminate the TLS connection. Instead, it must forward the request to the end application. This is known as TLS-passthrough.
The passthrough configuration needs a TCP route instead of an HTTP route. The route can be applied to the same entrypoint and uses an IngressRouteTCP resource instead of an IngressRoute resource.
apiVersion: traefik.containo.us/v1alpha1
kind: IngressRouteTCP
metadata:
  name: whoami
spec:
  entryPoints:
    - websecure
  routes:
  - match: HostSNI(`*`)
    kind: Rule
    services:
    - name: whoami
      port: 80
  tls:
    passthrough: true
The whoami application does not handle TLS traffic, so if you deploy this route, your browser will attempt to make a TLS connection to a plaintext endpoint and will generate an error.
Summing up
This article covered various Traefik Proxy configurations for serving HTTPS on Kubernetes. It works out-of-the-box with Let's Encrypt, taking care of all TLS certificate management. Traefik Proxy also provides all the necessary options for users who want to do TLS certificate management manually or via the deployed application.


